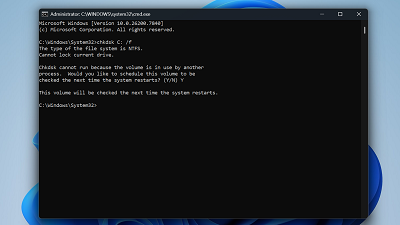
Recent Posts

Pages: 1 ... 5 6 [7] 8 9 10
61
We’ve identified a huge social-engineering campaign designed to steer people into online gambling sites under the impression they’re installing a legitimate app.

We’re calling it FriendlyDealer. It’s been observed across at least 1,500 domains, each hosting a website that impersonates the Google Play or Apple App Store. Users think they’re downloading a gambling app from a trusted source, with all the checks, reviews, and safeguards that implies. But they’re actually still on a website, installing a web app that then redirects them to casino offers through affiliate links.

The campaign doesn’t steal passwords or install traditional malware. Instead, it makes money through commissions every time someone signs up or deposits money at one of these sites.

That might sound less serious than a banking Trojan, but the end result is people being funneled into unregulated gambling sites with no age verification, no deposit limits, and no consumer protections. And it comes at a time when gambling addiction is being called the fastest explosion of gambling the country has ever seen.

One kit, dozens of apps, built to mimic real app stores

FriendlyDealer is built as a single, reusable kit that can generate many different fake app listings.

The kit detects what device you’re using and shows you a different fake store accordingly. Android users see a fake Google Play Store. iPhone users see a fake Apple App Store. The kit even loads the correct system fonts for each platform (Google Sans on Android, San Francisco on iOS) so the typography matches what you’d expect on your own phone.


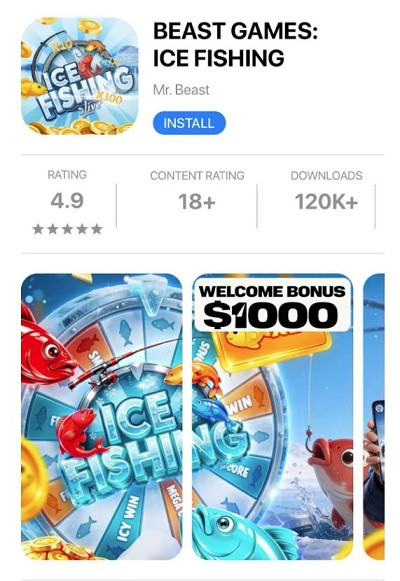
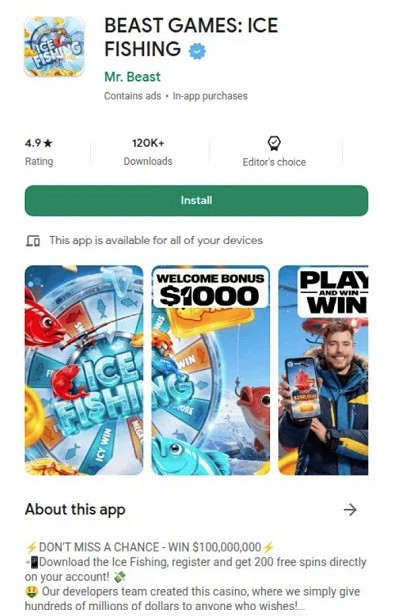
Fake Apple App Store page: BEAST GAMES: ICE FISHING by Mr. Beast
Under the hood, it’s a single web application that reads all of its content from one configuration file embedded in the page. Change that file, and you get a completely different app listing running on the same code.

The operators have used this to spin up at least twenty casino brands, from “Tower Rush” (189 deployments) to “Chicken Road” (97) to “BEAST GAMES: ICE FISHING” (43), which impersonates YouTube creator MrBeast. (It’s worth noting that some skins reuse the names of some legitimate gambling brands but none of these are affiliated with the operation.)

The reviews are fake. Different apps reuse identical usernames, profile photos, text, and developer replies, and they’re repeated across multiple brands. Before showing the fake store, the kit can also display a simple casino mini-game to build engagement.

The fake “Install” button on Android relies on a Chrome feature that only works on mobile. It captures Chrome’s install prompt and triggers it when tapped, so a real installation dialog appears. The usual warning about installing apps from unknown sources does not appear. Previous research has shown that apps installed this way can even display “Installed from Google Play Store” in your phone’s settings.

The code goes to extraordinary lengths to get you into the right browser. If you arrive through a Facebook or Instagram ad, you’re inside those apps’ built-in browser, which can’t trigger the install. On Android, the kit generates a special link that forces the page to reopen in Chrome. On iOS, it does the same thing but for Safari. If Chrome isn’t installed, the fallback sends you to the real Play Store to download it. There’s even a separate handler for Samsung’s browser. The browser-specific engineering is unusually detailed.

The page disables zooming, making close inspection harder. The kit assigns a per-user tracking ID and reuses it across analytics, event, push-registration, and offer-routing flows.


Fake Google Play page: BEAST GAMES: ICE FISHING by Mr. Beast
The kit is wired for paid advertising. The configuration includes empty slots for tracking pixels from four ad platforms: Google, Yandex, Facebook, and TikTok. The app and background script can forward Facebook-style ad identifiers (_fbc / _fbp) when those values are available. The code references Yandex telemetry fields and ships with Russian-language comments and debug strings, which is consistent with a Russian-speaking development context, though those artefacts could also have been inherited from a reused or purchased kit.

The flow is straightforward: buy ad traffic, detect the device, show a fake app store, trigger a real-looking install, and redirect to a casino through an affiliate link.

You’re not installing an app

When a user taps Install, the page doesn’t actually download an app. Instead, the browser creates what’s called a Progressive Web App (PWA). It’s essentially a website that behaves like an app, with its own icon on your home screen and its own splash screen. To most people it’s indistinguishable from a real app.

Once installed, the app can keep running in the background using browser features called service workers (keeping a persistent connection to your device). The samples include the main PWA worker and code to register a separate push worker (to send you notifications) when enabled.

The kit also knows when you’ve already installed it. It checks your device for its own PWA, and if it finds it, it skips the fake store entirely and sends you straight to the casino.

One domain ties it all together

Every FriendlyDealer deployment phones home to the same domain: ihavefriendseverywhere[.]xyz. This is the campaign’s data-collection server, and the name that inspired our tracking name for the operation.

The background script and app code send telemetry to this domain including browser language, timezone, user-agent data, optional user-agent client hints, campaign identifiers, and ad identifiers when those values are available. Much of this is sent via custom request headers.

Some requests use the HEAD method to stay lightweight.

The application code also sends something the background script doesn’t: JavaScript error reports. Every crash, every failed resource load, every unhandled exception that occurs on the victim’s device is caught, packaged into a structured error object with a timestamp and context, and posted to ihavefriendseverywhere[.]xyz/api/log_standard_err. In effect, the operators are collecting both user data and production error telemetry from real devices.

If a request fails (for example, due to poor signal), the background script stores it locally and retries later. Once the connection returns, the data is sent automatically.

The fake app also asks for notification permission. If the user grants it, the kit can register a push subscription and create a direct channel for future notifications. These appear like normal app notifications, giving the operators a direct line back to the user even after the app is closed.

Follow the money: affiliate commissions, not malware

FriendlyDealer doesn’t spread viruses or take over devices. The entire operation runs on affiliate commissions. Each fake app store page contains a hidden redirect to an affiliate tracking network. When a user signs up or deposits money, the operator gets paid.

We found multiple affiliate tracking networks in the code. A per-user ID appears across the kit’s analytics, event, push, and offer-routing logic, allowing activity to be correlated across multiple stages of the funnel.

This model explains the campaign’s enormous scale. Each domain is disposable. The kit is a template; change one configuration file and you have a new casino brand on a new domain in minutes. With gambling affiliate payouts reportedly ranging from $50 to $400 per depositing user, even a small conversion rate across a thousand domains adds up fast.

Who’s behind this?

We can’t attribute the campaign to a specific group, but there are clues. The source code contains Russian-language comments (for example, “Создаем таймер для измерения времени загрузки Vue “). One of the builds shipped with unstripped Russian debug strings that were scrubbed from the production version. The code integrates with Yandex Metrica, which is popular in Russia and the former Soviet states.

These point to a Russian-speaking development context, although the code could have been reused or purchased.

The code also contains affiliate marketing tags—preland-alias and preland-final-action—where a “pre-lander” is the page a visitor sees before the actual offer. The application code shows this tag controls the kit’s behavior: a value of 0 triggers a PWA install, while 1 redirects to an app store. Combined with plug-and-play ad pixel slots, per-deployment configuration, and staging/production logic, this strongly suggests a reusable kit built for multiple campaigns or operators, not a one-off project.

We found multiple builds of the same kit. The production version has debug messages removed, but other builds include full Russian-language error messages and support for Arabic numerals across the interface—download counts, ratings, review dates, and more. This does not look like a kit built for a single market; it appears designed to support regional variants at build time.

A familiar trick with a different payoff

Fake app store pages are a known technique, often used to steal banking credentials or deliver spyware. FriendlyDealer uses the same playbook, a convincing fake store and a real-looking install flow, but with a different goal. It doesn’t take over your phone or steal your passwords. It steers you toward gambling platforms and earns a commission when you spend money.

The harm is financial rather than technical: victims are funneled toward gambling offers through deceptive install and redirect flows, and may end up depositing money at sites they did not intentionally choose.

It’s also s a reminder that not every scam is after your passwords. Affiliate fraud, especially in online gambling, can fund enormous operations without ever touching a single credential. The people behind this built a factory: one template, twenty brands, more than 1,500 domains. Paid ads bring the traffic. The fake app stores seal the deal. The affiliate network pays the bills.

What makes this effective is that it abuses things that are supposed to be trustworthy. Chrome’s app installation flow on Android and Safari’s “Add to Home Screen” on iPhone are both legitimate features, doing what they were designed to do. The problem is that the page triggering the install is a lie. The kit is carefully engineered so only the right users, on the right devices, coming from the right ads, ever see it.

What to do if you installed one of these apps

On Android:

Remove the app: Long-press the icon and tap Uninstall, or go to Settings > Apps and remove anything you don’t recognize.

Clear the site data in Chrome: The app may leave data behind in your browser. Open Chrome > Settings > Site settings > All sites, find the site, and tap Clear & reset.

Check notification permissions: Go to Chrome > Settings > Notifications and remove any sites you don’t recognize. Uninstalling the app does not remove notification access.

Check other browsers: If you use Edge, Brave, or another Chromium-based browser, repeat the same steps there.

On iPhone:

Remove the app: Long-press the app icon on your home screen and tap Remove App. On iOS, PWAs don’t install a background script the way they do on Android, so removing the icon also removes the cached site data.

Clear the site data in Safari: Go to Settings > Safari > Advanced > Website Data, and search for the domain. Swipe to delete it. This clears any remaining cookies and stored data.

Check notification permissions: Go to Settings > Apps > Safari. Scroll to the Settings for Websites section and tap Notifications. Find the site and remove or deny access.

If you deposited money after being routed through one of these pages and believe you were deceived, contact your bank or payment provider promptly.

Indicators of Compromise (IOCs)

Domains

   • ihavefriendseverywhere[.]xyz—Data exfiltration and error-logging server

   • valor[.]bet—Gate/checkpoint URL (/__pwa_gate path)

   • wikis[.]lifestyle—Hardcoded domain reference in application code

source
62
Apple / Happy Birthday, Apple!
« Last post by javajolt on March 30, 2026, 08:03:48 PM »
It's not an April Fool's Joke.

Apple's celebrating half a century this week.


The Steve Jobs Theater at Apple Park is where the company's annual fall event takes place. | CNET

Happy 50th Birthday, Apple. On April 1, 1976, Steve Jobs, Steve Wozniak and Ronald Wayne launched the Apple Computer Company (renamed Apple in 2007) to sell the Apple Computer 1 (Apple-I) -- without a monitor or keyboard.

Now 50 years later, Apple has evolved into one of the world's largest companies with an extensive lineup of devices, including smartphones, laptops, earbuds, tablets and smartwatches. Beyond its personal gadgets, Apple has evolved into the smart home and entertainment spaces with the Vision Pro, HomePod and Apple TV. For many of us, including myself, it's literally the apple of my eye. I'm deep into Apple's ecosystem, between my iPhone 17 Pro Max, MacBook Pro, iPad Mini, AirPods Pro 2 and Apple Watch.

But let's be honest -- Apple hasn't always gotten it right. Some products and features flopped, like the Apple Newton and iTunes Ping, while others were overrated, like the $3,500 Apple Vision Pro headset (more on that below).

I asked CNET writers and editors to reminisce about Apple's legacy, and it's clear we all respect Apple for thinking differently -- a phrase used in one of its most iconic ad campaigns, narrated by Richard Dreyfuss.

Let's take a trip down memory lane.

These Apple gadgets saved us over the years

AirPods Pro hearing test


In 2024, Apple introduced a new hearing test feature to the AirPods Pro 2. The newer AirPods Pro 3
also support the tool. | Jeff Carlson/CNET


When many of us found ourselves in an SOS moment, we turned to our Apple devices and features for help in a pinch. For Anna Gragert, CNET's wellness editor, the AirPods hearing test assured her that her hearing was normal after dealing with hearing loss and recovering. Now, the Reminders app is helping her remember to take her medications on time.

Apple Watch with cellular connectivity


The Apple Watch Series 11 launched in 2025 alongside the Ultra 3 and SE 3. | Vanessa Hand Orellana/CNET

Mike Sorrentino, CNET's mobile senior editor, recalls his phone battery dying, but being able to use the cellular connection on his Apple Watch to coordinate a ride home after returning from a trip. And the Apple Watch gets credit for identifying life-saving health data that prompted many of our loved ones to seek care.

Find My


Find My debuted in 2010 as Find My iPhone. Now it supports locating Apple devices, accessories,
third-party items and the AirTag, which can be attached to things like luggage to keep track of their
location. | Patrick Holland/CNET


However, Apple's Find My app is the biggest feature that's saved many of us. It helps locate your Apple devices and loved ones who share their location with you. Ty Pendlebury, CNET's streaming editor, remembers using the app to find his phone that he had accidentally left on a bench in Central Park.

David Katzmaier, CNET's editor-in-chief, used Find My to locate an AirPod that his daughter lost. The good news is that he found it, but the bad news is that it was in another county. You can even use the Find My network to find your dead iPhone from another Apple device.

The most underrated Apple device is the long-gone iPod

Our team can't agree on just one underrated Apple device. The Apple Pencil takes the iPad's capabilities to a new level, and the 13-inch MacBook Air is powerful, lightweight and small enough to fit on an airplane tray table. But some devices don't get enough credit, like the iPod, which was discontinued in 2022.

iPod Classic


Originally known just as the iPod when it debuted in 2001, the iconic music player earned its Classic
moniker in 2007, months after the original iPhone went on sale. | James Martin/CNET


iPod Nano


This is the iPod Nano 3rd-generation, which had a gorgeous square design and, when it debuted in
2007, it had the highest resolution screen on any Apple product. The Nano line debuted in 2005,
replacing the iPod Mini. | Apple


And Katelyn Chedraoui, CNET's AI writer, wants the iPod Nano back now. It was the perfect size, came in fun colors and did exactly what it was supposed to do," Chedraoui says. "Even just the sound of clicking through your library is nostalgic. I would love to use it now while I'm working or exercising to avoid being inundated by my phone's notifications."

The Apple Watch and Vision Pro are the most overrated

On the other hand, it's a toss-up between which Apple products are the most overrated. CNET staffers have varying hot takes on what's really worth the money, but for some, the Apple Watch and Apple Vision Pro are the most overrated.

Apple Watch


All three Apple Watch models announced at Apple's Sept. 9 event: Apple Watch Ultra 3, Apple Watch
Series 11 and Apple Watch SE 3 (left to right). | Celso Bulgatti/CNET


As for the Apple Watch, David Watsky, CNET's home tech managing editor, has a take I've heard before.

"I find them to be information overkill, and it's not healthy to have that much data attached to your body," he says.

Apple Vision Pro


When the Vision Pro first went on sale, Apple added lights shaped like the headset's silhouette to its
flagship Fifth Avenue retail store in New York. | Bridget Carey


Meanwhile, a couple of CNET writers don't believe that the Vision Pro is worth its $3,500 price, especially for the average person. CNET principal writer Scott Stein shared that Apple's headset's price is its biggest downside. There aren't enough apps, there are glitches, and it's absurdly expensive, he says,

Jeff Carlson, CNET's mobile senior writer, says the Vision Pro is an answer in search of a market rather than a solution to a problem (like most Apple devices). But he still believes there's a chance the VR headset could become the most underrated device, especially if the price drops.

iPhone Pro


The iPhone 17 Pro and Pro Max launched in September 2025 and came is
a loud, bright Cosmic Orange color. | Celso Bulgatti/CNET


Other overrated products include the iPhone Pro. Katzmaier says he's had the base model for years and hasn't missed the telephoto lens, which has also saved him money.

Here are the 50th anniversary products we want Apple to release


In 1997, Apple released a special computer, the Twentieth Anniversary Macintosh, to mark its 20th
year as a company. Interestingly, the TAM came out closer to the company's 21st anniversary and
had a 250MHz processor, 2MB of VRAM, a 2GB hard drive, an FM/TV tuner and a Super floppy drive.
Michael Tullberg/Getty Images


Apple has been known to surprise us over the years. So far, this year, it has added the MacBook Neo, iPhone 17E and AirPods Max 2 to its product lineup.

There's no word on whether Apple will be dropping a new device on its 50th birthday, but the company has been full of surprises lately. CNET staffers are torn over what 50th-anniversary gadget Apple might release, if any. Some want Apple to add a new product to the lineup -- like an Apple TV that's actually a TV set, a smart ring (like the Oura ring) or an electric vehicle.

Others want Apple to release something nostalgic, like an iPod or a retro iMac case. Still others hope for a fresh take on a gadget already in Apple's lineup, like a foldable iPhone (rumors say it could be coming later this year). And yet other CNET staff hope for a limited-edition Apple Watch with a special band to commemorate the original Apple Computer 1's 50th anniversary.

There's no telling if there will be a new or special-edition product, so we'll have to wait and see.

Our favorite (and frustrating) Apple moments


At CES 2018, CNET invited phone case makers to a drop test. All they had to do was bring an iPhone
X with their case on it and we'd test it against other companies from various heights. | Lexy Savvides/CNET


Some of our favorite moments are sweet and simple, like Nasha Addarich Martínez, CNET's managing editor, who loves the sound of turning on a new MacBook for the first time. And McAuliffe recalls using an iPhone for the first time in 2016, after having an Android, and finally understanding the hype.

Others are bolder and venturesome, like Vanessa Hand Orellana, CNET's mobile lead writer, who launched iPhones off a 20-foot boom lift at the Las Vegas Convention Center during CES as part of an iPhone case drop test. Of the 12 cases, only four iPhones emerged unscathed.

But Apple has some quirks that our team isn't fond of. Every day that Pendlebury logs into his work laptop, it sends a multi-factor authentication notification to his kid's iPad to access iTunes and the App Store on his work MacBook -- which can be annoying. And Lumb has a lifelong vendetta against Apple Podcasts for its less-than-ideal functionality.

The questions we wish we could all ask Steve Jobs


During his keynote for the iPad's debut, Steve Jobs showed a photo of himself and Steve Wozniak
from the early days at the Apple Computer Company. | Justin Sullivan/Getty Images


We all know Steve Jobs as Apple's former CEO and a pioneer. His vision for the company leaves us with many questions, ranging from his personal life to his relationship with Steve Wozniak and his thoughts on generative AI and LLMs. There's a lot we want to know.

The bigger questions we have are around what Apple has become today. Like, what product design choices would have made him cringe, and would he hate the fact that the Magic Mouse's charging port is on the bottom like the rest of us? The charging port is still at the bottom, even in 2026, which may hint that Apple wants to maintain a sleek design, but we don't know for sure.

By the way, back in 2011, Jobs stated in his biography that he finally cracked the TV. Knowing that Apple planned to expand into the TV category, we're curious about what he meant by this.

We're also curious what he would think of Apple today, especially around topics like AI and services. We also want to know what he's most and least proud of regarding his company's impact on technology.

There are a few other eyebrow-raising questions, like whether he would have given President Donald Trump a 24K gold-and-glass statue, as Apple CEO Tim Cook did.

All in all, Apple means a lot to us


CNET's Patrick Holland, Abrar Al-Heeti and Vanessa Hand-Orellana (left to right) in front of the Apple
Park welcome center for the iPhone 17 launch event in September 2025. | CNET


Summing up how Apple has impacted our lives as tech experts is tough. Even for Chedraoui, who's never lived in a world without an iPhone.

"I was a kid when the first iPhone dropped, and I never wanted a BlackBerry or Nokia or flip phone -- I wanted a smartphone, and I wanted an iPhone," she says. "There was no world in which Apple wasn't my ideal tech dream."

Patrick Holland, CNET's director of content, says Apple is "wildly innovative" and deliberately slow to enter new product categories in order to launch a device that gets things right from the start (mostly). That approach has led the company to develop products and features we both want and need, like MagSafe, which makes it easy to wirelessly charge your iPhone without an outlet. Or Find My, which reduces the headaches of locating your keys -- if they're attached to an AirTag.

There is so much that comes to mind when we hear the word Apple. From its rainbow Macintosh logo to dominating the consumer tech space with devices like the iconic iPhone, watching Major League Soccer games on weekends thanks to Apple TV and doing Apple Fitness Plus workouts from my living room. For each of us, Apple means something different, but creating tech that challenges us to think differently is what Apple's best at. So, happy birthday, Apple. Here's to 50 more.

source
63


A new info-stealing malware named Infinity Stealer is targeting macOS systems with a Python payload packaged as an executable using the open-source Nuitka compiler.

The attack uses the ClickFix technique, presenting a fake CAPTCHA that mimics Cloudflare’s human verification check to trick users into executing malicious code.

Researchers at Malwarebytes say this is the first documented macOS campaign combining ClickFix delivery with a Python-based infostealer compiled using Nuitka.

Because Nuitka produces a native binary by compiling the Python script into C code, the resulting executable is more resistant to static analysis.

Compared to PyInstaller, which bundles Python with bytecode, it’s more evasive because it produces a real native binary with no obvious bytecode layer, making reverse engineering much harder.

“The final payload is written in Python and compiled with Nuitka, producing a native macOS binary. That makes it harder to analyze and detect than typical Python-based malware,” Malwarebystes says.

Attack chain

The attack begins with a ClickFix lure on the domain update-check[.]com, posing as a human verification step from Cloudflare and asking the user to complete the challenge by pasting a base64-obfuscated curl command into the macOS Terminal, bypassing OS-level defenses.


ClickFix step used in Infinity attacks | Source: Malwarebytes

The command decodes a Bash script that writes the stage-2 (Nuitka loader) to /tmp, then removes the quarantine flag, and executes it via ‘nohup.’ Finally, it passes the command-and-control (C2) and token via environment variables and then deletes itself and closes the Terminal window.

The Nuitka loader is an 8.6 MB Mach-O binary that contains a 35MB zstd-compressed archive, containing the stage-3 (UpdateHelper.bin), which is the Infinity Stealer malware.


The malware's disassembly view | Source: Malwarebytes

Before starting to collect sensitive data, the malware performs anti-analysis checks to determine whether it is running in a virtualized/sandboxed environment.

Malwarebytes’ analysis of the Python 3.11 payload uncovered that the info-stealer can take screenshots and harvest the following data:

   • Credentials from Chromium‑based browsers and Firefox

   • macOS Keychain entries

   • Cryptocurrency wallets

   • Plaintext secrets in developer files, such as .env

All stolen data is exfiltrated via HTTP POST requests to the C2, and a Telegram notification is sent to the threat actors upon completion of the operation.

Malwarebytes underlines that the appearance of malware like Infinity Stealer is proof that threats to macOS users are only getting more advanced and targeted.

Users should never paste into Terminal commands they find online and don’t fully understand.

source
64
Exposing a wider firmware problem


The CA 2023 revocation update turned a background security feature into a massive headache for
PC users and hardware vendors alike.


Secure Boot has been part of the PC ecosystem since 2011, but 2023–2025 finally pushed it into the spotlight, and not in a way Microsoft, OEMs, or firmware vendors might have liked. What was once a quiet, behind‑the‑scenes security feature suddenly became a front‑page story. Indeed, as the CA‑2023 certificate rolled out, it exposed long‑standing inconsistencies in firmware implementations, certificate handling, and update pipelines across the PC industry. To be both brief and brutal: it was neither pretty nor fun.

For Windows users, the result was a confusing mix of disturbing stuff. This included boot warnings, broken boot chains, and inconsistent or incoherent vendor guidance. The prevailing general sense was that Secure Boot, introduced to increase trust and reliability, had instead become a source of uncertainty and confusion.

This article unpacks the story of what Secure Boot is, how it works, why CA‑2023 matters, how vendors stumbled, and what users can do when Secure Boot updates fail. Along the way, I’ll explain every acronym, walk through the trust chain step‑by‑step, and offer practical guidance based on real‑world troubleshooting. I’ve just completed a grueling, if not epic, journey to get my small fleet of PCs (ranging in size from 10 to 15) fully secure boot-compliant and running from the CA 2023 boot certificates. It’s been quite a trip, and taught me more than I ever wanted to know.

What is Secure Boot and why is it important?

Secure Boot is a feature defined by the Unified Extensible Firmware Interface (UEFI), Intel’s modern replacement for legacy BIOS. Its purpose is to ensure that only trusted, signed bootloaders and operating system components can run during system startup.


The Windows Security dashboard showing Secure Boot active

To accomplish this, Secure Boot relies on a set of cryptographic keys stored in firmware. These keys define what is trusted, what is allowed, and what is explicitly forbidden.

Here are the key components:

Platform Key (PK)

The Platform Key establishes the system owner. Whoever controls the PK controls the Secure Boot configuration. Typically, OEMs install their own PK at the factory.

Key Exchange Key (KEK)

The Key Exchange Key authorizes updates to the Secure Boot databases. Microsoft, OEMs, and sometimes enterprise administrators maintain KEKs. A valid KEK is a ticket that permits a third party to apply updates to certificates and databases maintained in UEFI.

Allowed Signature Database (DB)

This database contains hashes and certificates for trusted bootloaders and OS components. If something invokes a signature present in the DB, the firmware allows it to run.

Forbidden Signature Database (DBX)

This is the “revocation list.” Anything in the DBX is explicitly blocked — even if it was once trusted. DBX updates are how the industry revokes compromised bootloaders. The original CA-2011 got the whole Secure Boot thing started; MS plans to revoke this later in 2026. The CA-2023 will replace it, and is slowly but surely rolling out via Windows Update and OEM UEFI updates.

Why is Secure Boot important?

Secure Boot is designed to stop rootkits, bootkits, and other pre‑OS malware. If attackers can compromise the boot chain, they can hide from the OS, evade detection, and maintain persistence indefinitely. They will keep coming back because they operate outside and independently of the OS. Secure Boot puts a stop to such shenanigans.

In theory, Secure Boot is a clean, elegant solution. In practice, the Secure Boot ecosystem is messy, fragmented, and full of edge cases.

However, Secure Boot is both more important and more binary than ever. On the plus side, when it works, it works well. On the minus side, when problems present, they can be challenging, vexing, and time-consuming.

The Secure Boot compromise that triggered CA-2023

In early 2023, Microsoft announced a major security issue where older Windows Boot Manager binaries had been compromised in ways that could allow bypassing Secure Boot. To mitigate this, the company issued a new DBX update called the CA‑2023 revocation. This update added vulnerable bootloaders to the forbidden list and provided a new, signed boot loader with a matching certificate that was immune to such attacks and issues.

Why was this necessary?

Attackers had discovered ways to exploit older bootloaders to disable Secure Boot protections. Revoking those binaries proved essential to maintaining the integrity of the ecosystem.

Why did this break systems?

Many OEMs had:

   • outdated firmware

   • inconsistent DB/DBX handling

   • broken update pipelines

   • non‑standard Secure Boot implementations

   • incomplete or incorrect key sets

   • firmware that silently ignored DBX updates

   • firmware that bricked systems when DBX updates were applied

In other words, the revocation exposed years of technical debt. In many cases, attempting updates was enough to impact PCs. In the best case, impacted PCs might not be able to restart (warm boot through the Power > Restart selections in the Start menu). Worst case, impacted PCs might be unable to boot, or even to access UEFI after powering on. Bad news!

Post CA-2023 Results

Millions of systems ended up in one of these states:

   • Secure Boot enabled but not actually enforcing revocations

   • Secure Boot disabled because updates failed

   • Secure Boot stuck in “User Mode” with mismatched keys

   • Systems unable to boot after DBX updates

   • Firmware that refused to apply the CA‑2023 update at all

This was not a Microsoft‑only problem. It was an ecosystem‑wide failure. Obviously, this turned Secure Boot into a travail for users with systems that exhibited one or more of such issues. For my own part, one of my ASRock B550 Extreme4 based Ryzen 5 PCs exhibited most, if not all, of these failings. Eventually, I had to replace the motherboard to get past them.

How does the “Secure Boot Chain” work?

To understand why CA‑2023 caused so much trouble, it helps to walk through the trust chain step‑by‑step.

Step 1: Firmware validates the PK

If the PK is valid, the system knows who “owns” the platform.

Step 2: Firmware validates KEKs

These keys authorize updates to DB and DBX.

Step 3: Firmware loads DB and DBX

These define what is allowed and what is forbidden.

Step 4: Firmware validates the bootloader

If the bootloader’s signature matches an entry in DB and is not in DBX, it runs.

Step 5: Bootloader validates OS components

Windows Boot Manager checks signatures on winload.efi, drivers, and other early‑boot components.

Step 6: OS boots with trust intact

If everything checks out, Windows loads normally.
Alas, lots of steps pose ample opportunities for things to go sideways. That’s what makes this approach somewhat fragile and occasionally prone to hang-ups or outright failure. Things can break or fail if any one of the following cases presents:

   • DB is missing a required signature

   • KEKs are outdated

   • PK is incorrect

   • Firmware mishandles updates

   • Bootloaders get mismatched (Windows maintains a separate copy in the C:\Windows folder hierarchy, while another instance gets used from the EFI partition)

If any such item presents, Secure Boot may fail or fall back. It may also silently fail to enforce its security regime. Thus, for example, I found myself in a situation where every boot presented a message that (falsely) reported a “CPU change” and asked to confirm current or roll back to previous TPM security settings. Here’s what that looked like:


It’s a known quirk of the ASRock B550 Extreme4 UEFI that it reports a processor change even when Secure Boot changes or updates occur. For about two weeks, in fact, I had to enter “N” on this screen every time I rebooted my system to get to the Windows desktop. This made each reboot take at least 2-3 minutes, and bothered me no end.

Common Secure Boot issues across different Motherboard vendors

The CA‑2023 rollout revealed that different vendors had wildly different levels of firmware discipline. Some desktop and laptop PCs sailed through without problems; others experienced anything from minor setbacks to major issues up to an including unbootable systems. Let’s take a look at how various vendors fared in this situation.

ASUS

Some ASUS boards refused to apply DBX updates unless Secure Boot was temporarily disabled — a paradoxical requirement. Others applied updates but left systems in a “half‑revoked” state. The CA-2011 certificate might still be used (or not) even if the CA-2023 certificate was present.

MSI

   • Some (but not all) MSI boards were notorious for:

   • inconsistent DBX handling

   • firmware that silently ignored updates

   • Secure Boot modes that didn’t match UI labels

   • systems that reverted to factory keys unexpectedly

ASRock

ASRock boards often required manual intervention for such things as:

   • clearing keys

   • reinstalling factory defaults

   • re‑enrolling Microsoft keys

   • manually applying DBX updates

Their documentation was sparse, and many users were left guessing. In my own case, I had two supposedly identical motherboards, both B550 Extreme4 models. One of them surrendered to manual, and Microsoft WU supplied updates. The other could never reconcile the pending updates from the OS (both WU and manually applied) to the contents of the various firmware databases. Indeed, that’s what provoked the ongoing series of “CPU change” warnings depicted in the previous section of this story.

65
Dell, HP, Lenovo (and other OEMs…)

Enterprise and consumer oriented PC and laptop vendors (including also Acer, ASUS, Dynabook, etc.) generally did better, but even they had:

   • staggered rollouts

   • inconsistent BIOS/UEFI update timing

   • some systems that required multiple reboots to apply DBX changes

As I looked at read forum posts at answers.microsoft.com, TenForums.com, ElevenForum.com, and TechPowerUp.com, I saw hundreds upon hundreds of forum threads that sought help in dealing with Secure Boot issues. Many involved laptops, and many more involved desktops, particularly DIY home-brew builds or those from boutique builders who assemble best-of-breed commercial parts to build bespoke PCs for well-heeled buyers (see next section).

Custom‑built PCs

Motherboards from the same vendor might behave differently depending on:

   • actual chipsets installed

   • firmware branch

   • release year

   • OEM vs retail SKU

Overall, the lack of standardization has been obvious. The Secure Boot problems users encountered have been all over the place. Some have ultimately yielded to Windows Update or manual changes. Others have stubbornly resisted all attempts at repair or correction. I’ve personally been all over this problem space, with failures recently overtaken by successes (but failures, nonetheless).

What users can do if Secure Boot updates fail


Checking the System Information (msinfo32) utility is the quickest way to verify if Windows recognizes your Secure Boot state as active.

There are all kinds of ways in which Secure Boot can fail. Windows update may report success, but the DBX (revocations list) never changes. Firmware may report that Secure Boot is “enabled,” but it isn’t being enforced (the PowerShell confirm-SecureBootUEFI will report false in that case).

Systems may boot but fail compliance checks (see Garlin Scripts section later in this story for more details). Bootloaders may not match DB entries, or systems may boot only reluctantly or not at all after updates (as happened on my ASRock B550 Extreme4 system). There’s a lot going on here, so there are lots of things to try should one need to fix them. Let’s march through a list of possibly poignant causes and related fixes.

Mismatched Keys (PK/KEK/DB/DBX)

If the PK or KEK is outdated, firmware may reject database updates into the list of valid credentials and values (DB) or its list of revoked items (DBX). If that happens, it’s worth trying one or all of these fixes:

• Reset to factory or default keys (usually available as a selectable action in UEFI, when Secure Boot is in Custom mode)

• Re-enroll Microsoft keys (usually requires re-applying a Microsoft update, which entails an uninstall/reinstall maneuver, possibly via DISM—WU offers time-limited rollback)

Firmware Ignores DB or DBX Updates

On some PCs and laptops, UEFI won’t apply DB or DBX updates except under certain conditions. Secure Boot may need to be disabled. The Compatibility Support Module (CSM, which enables “dual boot” into either BIOS or UEFI modes; modern PCs are UEFI-only, but older models often go both ways) must be turned off. Sometimes, Secure Boot keys must be cleared (another UEFI option) must be cleared before updates will take. Experimentation may be needed to see what’s what; if you’re lucky, you’ll find info from other intrepid explorers who’ve already seen and solved your particular problem.

Outdated Bootloaders

Older Windows install media or repair/recovery disks may incorporate bootloaders that are too old to work with Secure Boot. Indeed, this mismatch will accelerate later in 2026 after Microsoft gets more deeply into revoking CA-2011 (which is what most older bootloaders incorporate). If a bootloader is too old, DBX may block it. Fixes are fairly straightforward because bootloaders don’t interact with firmware (UEFI). Try any of the following repairs in this case:

• Run Windows Update: it may replace an outdated bootloader with a current one

• Rebuild boot files using the bcdboot utility

• Make sure the EFI partition is healthy (and rebuild it if it isn’t)

Firmware Bugs or Oddities

Especially on older PCs, it’s a good idea to update (flash) the UEFI before getting into Secure Boot. For old enough PCs, though, updates into 2023 and newer may simply not exist. But for systems that require multiple reboots, specific firmware versions, or manual Secure Boot database (DB, DBX) imports, a few techniques will be helpful:

• Update the firmware to the latest stable version (consider beta versions only if all other options have failed: you don’t want to trade one cause of instability for another)

• Wherever available, use vendor-supplied capsules or updates to apply Secure Boot database changes (e.g., my MSI MAG Tomahawk didn’t work properly until I’d flashed its UEFI, which included Secure Boot and CA-2023 elements built right in)

• Let Windows Update do its thing only AFTER the firmware is current: new updates and old firmware make for a volatile and issue-prone environment, as I learned on the ASRock B550 Extreme4 build

All in all, if users attempt Secure Boot compliance work from firmware updates to Windows updates, and only get into manual UEFI operations if necessary, they’re far less likely to get stuck in some pothole along that road.

How the scripts help solve Secure Boot update issues

Some of the most interesting developments during the CA-2023 rollout has been the emergence of community-driven tooling and diagnostics. In particular, Eleven Forum VIP and Guru user Garlin has provided a 50-page+ thread with useful PowerShell scripts, and backed them up with incredibly useful support and discussion. His scripts do the following:

   • enumerate Secure Boot keys

   • validate DB/DBX entries

   • detect mismatches

   • identify outdated bootloaders

   • verify enforcement status

   • generate detailed reports

For many users, Garlin’s scripts were the first clear window into what their firmware was actually doing. As an illustration of what the Garlin scripts illuminate, Figure 1 shows the output of his script named Check_UEFI-CA2023.ps1, captured from my recently rebuilt MSI MAG Tomahawk B550 desktop:


Output from Check_UEFI-CA2023.ps1 on the MSI MAG B550 desktop PC

Careful examination of the screenshot above shows the PC has both CA 2011 and CA 2023 Key Exchange Keys (KEKs) installed, with DB certs for UEFI CA 2011, Windows PCA 2011, and three flavors of CA 2023. The DBX certs list is empty (if you look below, you’ll see that CA 2011 hasn’t yet been revoked; once that happens, those entries should move here).

EFI files show that the boot manager allows UEFI CA 2023, as does the registry, and the latest Secure Boot code integrity policy is in place. MS uses this policy to block vulnerable or rollback-susceptible boot-critical binaries, particularly for Virtualization Based Security (VBS, as mentioned in the second item in the script’s overall output).

Finally, the script output shows the older CA-2011 certification hasn’t yet been revoked. That’s deliberate: I’m waiting to see how and when Microsoft will handle this through Windows Update, as they’ve promised to do sometime in the second half of 2026. We’ll see how that turns out…

Why these Scripts matter

Vendors rarely expose a PC’s full Secure Boot state. Windows surface only part of this picture. Firmware UIs are inconsistent and often call the same things by different names. Garlin’s scripts show us what’s going on inside the Secure Boot sphere, and tell us what actions might need to be taken to complete the overall process of updating and catching up.

What to do when Secure Boot won’t apply updates

Here’s a practical, step-by-step recovery workflow.

Step 1: Verify Current State

Use PowerShell or Garlin’s scripts to check:

   • PK

   • KEK

   • DB

   • DBX

   • Enforcement status

   • Bootloader versions

Step 2: Update Firmware

Install the latest BIOS/UEFI update.

Step 3: Reset Keys to Factory Defaults

Disable Secure Boot, set Mode to Custom, then reset or install factory default keys (different UEFIs use varying terminology). Whatever they call it, this often clears mismatches.

Step 4: Re-enable Secure Boot

Ensure CSM is disabled (it often gets turned on when UEFI gets updated; it must be turned off for Secure Boot to be enabled).

Step 5: Apply DBX Update(s)

Use Windows Update or vendor capsule(s), as available. Check the system (or motherboard) vendor’s support pages to look for UEFI and related updates. That’s what did the trick for my MSI MAG Tomahawk B550 motherboard.

Step 6: Rebuild Boot Files (if needed)

You can use built-in commands to recreate your boot files by running the bcdboot C:\Windows /f UEFI command. Sometimes, it may be necessary to boot to a repair or rescue disk and run this from the Windows Recovery (WinRE) environment. It is always safer to take this approach, and it will get you past boot problems or secure boot policy blocks if and when they should pop up.

Step 7: Re-verify State

Confirm DBX contains CA 2023 entries. Indeed, this would be a good time to run Garlin’s Check_UEFI-CA2023.ps1 script. (Note: if you look inside the file’s Properties window and check the Unblock option, you can run this script in PowerShell without changing or bypassing local execution policy. This is depicted in the screenshot below)

IMO, the Secure Boot Ecosystem needs reform

The gradual rollout of CA 2023 and recent efforts to catch systems up to current Secure Boot compliance have been interesting. But it has also exposed a wide range of systemic issues and problems. For one thing, firmware vendors lack consistent implementations and terminology, so it falls on IT pros and other installers to make things work. To exacerbate things, documentation is often poor, and fails to address remediations when things break or don’t work properly.

Right now, update pipelines are fragile. One misstep (such as failing to set Secure Boot to Custom mode before seeking to reinstall default keys) can cause the update process to get stuck, and can interfere with normal boot behaviors. On one of my ASRock desktops, I couldn’t restart that PC normally, and could only use a deep, cold boot to get into UEFI or run through the boot cycle (this lasted two weeks before I switched motherboards to get things working normally again). This also drives my observation that OEMs and motherboard vendors vary widely in quality of Secure Boot implementation and handling. At the same time that the ASRock mobo was driving me bonkers, I had no problems with any of my Lenovo systems (some dating back to 2018), nor my Dell mini-PC or an ASUS Snapdragon laptop, either.

What I learned during this process is that Secure Boot is only as strong as its weakest link. Some systems, alas, have weak links. Many of those weak links turn what should be a routine update into a struggle. Some of them can require even more drastic measures, like a system replacement or motherboard swap.

What Microsoft, OEMs, and users must do

All the kids on this playground need to do certain things to improve the current Secure Boot morass. In my opinion, here’s how this shakes out across Microsoft, OEMs and the user community. To begin with, Microsoft should enforce stricter certification, with improved diagnostics and better tools (Garlin’s scripts are pretty straightforward in hindsight; there’s no reason why MS can’t offer more polished implementations to help things along).

Next, the OEMs could do a lot to standardize firmware behavior and adopt consistent terminology. They can test their DB update more and more thoroughly, and provide more insight and clarity into Secure Boot state and values in their UEFI interfaces. A robust, automated rollback tool would also help undo incorrect or bad choices.

And finally, users should take security more seriously. This means updating firmware as new updates emerge, and resolving to use (not disable) Secure Boot except when installs, configuration changes, or updates demand it be turned off (temporarily). Users should also verify their Secure Boot databases periodically to make sure they’re current and correct, and make sure their EFI partitions are healthy and up-to-date.

If everybody does their part, Secure Boot can do its job of protecting systems from boot and root-level compromise and attack. That’s pretty important, so I think it’s worth doing.

Secure Boot still matters, but it needs work

Secure Boot remains an important defense mechanism in the Windows security model. But the CA 2023 saga shows that this ecosystem is fragile, inconsistent, and overdue for modernization. The good news is that the industry is learning. Firmware vendors are improving. Microsoft is tightening requirements. Community tools are filling gaps. But the lesson is clear: trust is no set-it-and-forget-it thing. Trust must be maintained, verified, and occasionally repaired. Secure Boot is no exception.

My closing advice is to watch the time ticking as you work to solve Secure Boot problems, should they present themselves. If a problem takes half a day to fix, that’s tolerable. Any longer than that, and it’s time to start thinking about alternatives, workarounds, and replacements. While you’re thinking, you can turn Secure Boot off: Windows still works without it. But you may, as I did, decide to replace balky, stuck hardware components rather than keep fighting, with no certain resolution in sight. It’s up to you!

source
66
Skip endless settings menus. Here's five Windows command-line tools to repair system files, fix disk errors, reset networking, flush DNS, and more.


Sometimes when something breaks in Windows, I skip the Settings app and go straight to Command Prompt. Five built-in commands handle the bulk of common problems - repairing corrupted system files, catching disk errors, clearing stale DNS entries, resetting broken network connections, and checking laptop battery health. Each one runs in a single line and delivers results faster than any Settings menu or troubleshooter.

SFC Finds and Repairs Corrupted System Files Automatically

Windows depends on thousands of system files to function properly, and any of them can become corrupted due to bad updates, sudden shutdowns, or even malware. When that happens, you get vague symptoms such as apps crashing for no reason, Windows features stopping, or missing DLL errors.

The System File Checker (SFC) scans every protected system file on your machine and compares it against a cached copy. If something doesn't match, it automatically replaces the corrupted file. To run it, open Command Prompt as administrator, type sfc /scannow, and press Enter. The scan usually takes 10 to 15 minutes and needs no input from you once it starts.


Once it finishes, SFC reports one of three outcomes. It either shows no integrity violations found, corrupt files found and repaired, or corrupt files found, but not all could be fixed. If you get the third result, run DISM /Online /Cleanup-Image /RestoreHealth first. This pulls fresh copies of files from Windows Update, then run sfc /scannow again. It should succeed this time.


I use SFC as my first move whenever Windows starts behaving strangely after an update. It's the fastest way to rule out file corruption before wasting time on deeper troubleshooting.

CHKDSK Catches Disk Errors Before They Destroy Your Data

File system errors can build up silently. Bad sectors, metadata corruption, and improper shutdowns all leave marks on your drive, and you won't notice until Windows throws a blue screen (BSOD). CHKDSK catches these problems early, before they snowball into actual data loss.

The two flags worth knowing are /f and /r. Running chkdsk C: /f fixes file system errors, while chkdsk C: /r goes further-it locates bad sectors and recovers whatever data it can. The /r flag includes everything /f does, so it's the more thorough option, though it takes considerably longer.


CHKDSK works on both HDDs and SSDs. However, on SSDs, it won't scan for bad sectors the same way since SSDs handle that internally through their own controllers, but it still catches and repairs file system errors, which are the more common problem regardless of drive type.

One thing that catches people off guard: if you run CHKDSK on your system drive, Windows can't scan it while it's in use. It'll ask to schedule the scan for the next reboot. If you say yes, your PC will run the check before Windows loads, and that pre-boot screen is completely normal.

I run CHKDSK once every few months, especially on older hardware.

Flushing DNS Instantly Fixes Weird Browsing Problems

Windows caches DNS lookups locally, so it doesn't have to resolve the same web addresses repeatedly. That's efficient until the cache goes stale. When it does, you get bizarre browsing behavior that includes specific websites refusing to load, or your browser throws a "DNS_PROBE_FINISHED_NXDOMAIN" error while everything else works fine.

The fix takes about two seconds. Open Command Prompt as administrator, type ipconfig /flushdns, and hit Enter. You'll get a confirmation that says "Successfully flushed the DNS Resolver Cache." That's it. Windows will now fetch fresh DNS records on your next request.


I flush DNS whenever I switch to a different DNS provider, after removing malware, or when a website I visited an hour ago suddenly stops loading. It's also worth knowing about two companion commands: ipconfig /release and ipconfig /renew. They drop and re-request your IP address from the router. Together, these three commands resolve most connection quirks without touching the settings page.

Resetting Winsock Fixes Broken Network Connections That Nothing Else Will

Sometimes your network just dies. The Wi-Fi icon shows a connection, your router is working fine, and other devices can browse without issues, but your PC refuses to load anything. The Windows troubleshooter tells you something is wrong and then does nothing about it. This is usually a corrupted Winsock catalog.

Winsock is the interface Windows uses to talk to network services. VPN software, antivirus tools, and malware can all corrupt it, and when they do, your network stack essentially breaks from the inside. No amount of toggling airplane mode or restarting the router will help.

To fix this, open Command Prompt as administrator, type netsh winsock reset, and press Enter. Then restart your PC - this step is mandatory for the reset to take effect.


Note: This command resets networking configuration to factory defaults, so programs that installed custom network components, such as certain VPNs or firewalls, may need to be reinstalled or reconfigured afterward.

Battery Report Tells You What Windows Won't About Your Battery Health

Windows shows you a battery percentage in the taskbar and nothing else. There's no built-in settings page that tells you how much capacity your battery has actually lost over time - which is strange, considering every laptop battery degrades with use. The information exists, but Windows just doesn't surface it anywhere obvious.

Running powercfg /batteryreport in an elevated Command Prompt generates a detailed HTML report and saves it to your user folder. The file path appears in the output, and you can copy it into a browser to open the report.


The section that matters most is Design Capacity versus Full Charge Capacity. Design Capacity is what the battery held when it was new; Full Charge Capacity is what it holds now. If the current number has dropped below 60-70% of the original, your battery is on its way out, and a replacement is worth considering.

The report also logs charge cycles and usage history, which makes it handy when buying a used laptop. I check mine every few months to keep tabs on degradation.

These five commands cover a lot of ground, but the command line goes deeper than this. Tools like DISM for repairing the Windows image, diskpart for managing partitions, and shutdown /r /o for booting straight into recovery options are all worth exploring next. Once you're comfortable running a few commands, the Settings app starts to feel like the slow route it always was.

source
67

Emergency Windows 11 update confirmed by Microsoft.
SOPA Images/LightRocket via Getty Images
Updated March 18: Following confirmation of an emergency, out-of-band, security update impacting Windows 11 versions 25H2, 24H2 and Windows 11 Enterprise LTSC 2024, this article has been updated with a statement by Microsoft in response to a request for clarification on the reasons for the update after the Patch Tuesday rollout which appeared to have already addressed the CVE-2026-25172, CVE-2026-25173 and CVE-2026-26111 Windows Routing and Remote Access Service vulnerabilities.

Patch Tuesday has been and gone, but the monthly security updates from Microsoft just keep on coming. The latest is an emergency, out-of-band, hotpatch for a subset of Windows 11 enterprise users that addresses a bunch of criticial security vulnerabilities impacting the Routing and Remote Access Service which could give attackers the ability to execute remote code and, potentially, take control of the impacted device. Here’s what we know about the Common Vulnerabilities and Exposures designated as CVE-2026-25172, CVE-2026-25173 and CVE-2026-26111, and the emergency update itself itself.

Microsoft Windows 11 Hotpatch Security Update—What The Enterprise Needs To Know

The latest out-of-band security update from Microsoft is, truth be told, something of an oddity. I say that as it is a fix for three critical vulnerabilities that had already been addressed by the March Patch Tuesday rollout.

The Microsoft security advisory stated: “This issue only applies to a limited set of scenarios involving Enterprise client devices running hotpatch updates and being used for remote server management." The three vulnerabilities all affect the Windows Routing and Remote Access Service management tool, and connecting to a malicious server could be all it takes to trigger the attack chain.

CVE-2026-25172, CVE-2026-25173 and CVE-2026-26111 are all remote code execution vulnerabilities, using access to a malicious server by way of the RRAS interface to start exploitation. The official description from the Microsoft Security Response Center is that of an “integer overflow or wraparound in Windows Routing and Remote Access Service (RRAS) allows an authorized attacker to execute code over a network”

In other words, and here’s the important bit, an attacker who is already authenticated on the domain could essentially trick a domain-joined user to send a request to the malicious server via the RRAS snap-in. Given that a patch had already been made available, you may be wondering why there’s a need for this emergency hotpatch. The answer lies with the fact that the Patch Tuesday fix requires a device reboot, and something running your critical applications or services isn’t open to rebooting on a whim, for obvious reasons.

Which is where the hotpatch system comes into play, as it doesn’t require the reboot. A hotpatch will download and install in the background, deployed within the in-memory code of already running processes.

Microsoft has also confirmed that it will enable hotpatch security updates by default, through the Windows Autopatch enterprise service, with the release of the Windows security update in May for those managing devices using Intune and the Graph API.

“This change in approach patches devices significantly faster since they aren’t waiting for that restart. To see how this is working in the real world, we asked four different companies with 30-70K devices about their gains in the number of days to security compliance. They all reported achieving 90% patch compliance in half the previous time, without making any policy changes,” Microsoft said. “Today, there are over 10 million production devices enrolled in hotpatch updates,” the Microsoft announcement continued, “showing the level of adoption and trust companies like yours have in this capability.” Microsoft also teased that additional IT controls will be released in April for organizations not yet ready for this change.

Microsoft Issues Statement Providing Clarification On Windows 11 Out-Of-Band Hotpatch Security Update

“This hotpatch update is offered only to hotpatch‑enabled devices. No action is required for devices that receive standard Windows updates,” Microsoft said. According to Bleeping Computer, Microsoft had “previously released hotfixes for these flaws,” but re-released them to "ensure comprehensive coverage across all affected scenarios." What those scenarios were, and why the emergency hotpatch update was necessary, isn’t immediately clear.

I reached out to Microsoft for clarification, and a spokesperson provided the following statement: “We identified that the Routing and Remote Access Service (RRAS) vulnerability could affect Enterprise devices deploying Windows hotpatch updates on Windows 11, versions 24H2 and 25H2. To address this scenario, we released an out-of-band hotpatch update (KB5084597) for hotpatch-enabled devices, allowing rapid installation without requiring a restart. Currently, there is no indication of exploitation, and we recommend customers follow the updated CVE guidance to remain protected.”

source
68


Windows is particularly stellar at window management, and the operating system took things up a notch with Snap Layouts in Windows 11. They make it easy to organize windows and apps by snapping them into place across your screen, keeping the UI clean and productive. However, ultrawide monitors might find they need a better solution to maximize the extra space without feeling overwhelmed. That's where FancyZones come in — it's a feature included in the free PowerToys utility that lets you create and save window snapping layouts. They can be activated with a simple keyboard command, saving you the hassle of organizing your desktop space each time you fire up your PC.

The name FancyZones comes from the feature's use of "zones" to determine where windows snap on your desktop. When using the default Windows 11 Snap Layouts feature, you are limited to Microsoft's preset snapping zones. FancyZones lets you create your own snapping zones, allowing you to find the perfect spot for your windows. Contrary to popular belief, this utility doesn't split your ultrawide monitor into multiple virtual monitors. It simply gives you more control over how you can organize windows and apps, which is especially appreciated on widescreen displays.

FancyZones snaps windows in place

It's a better way to organize and manage your windows and apps


At its core, FancyZones is a way to snap windows in place. If your needs are met by Windows 11's default Snap Layouts and Snap Assist features, you might not need FancyZones. There are a few ways the default options might fall short, though. For one, Snap Layouts work with a maximum of two window columns. This makes sense for a standard monitor, where having two apps side-by-side feels like the maximum. For an ultrawide monitor, it's a completely different story. You can fit three or four apps comfortably in vertical columns on the ultrawide screen, but Snap Layouts won't let you do that.

Instead, you need to install PowerToys from the Microsoft Store or GitHub, and fire up FancyZones. After starting up PowerToys, navigate through Windows & Layouts → FancyZones and flip the toggle beside Enable FancyZones. From there, you can start playing around with the default zones in FancyZones. Click and drag a window while pressing the Shift key to see your zones. Release a window in a zone to see it snap into place.

To use FancyZones as a replacement for Snap Layouts, dig into the PowerToys settings and select the Override Windows Snap option. Then, you can use the Windows key and the arrow keys to snap windows into active zones using keyboard shortcuts. This is already a pretty neat way to manage windows, but the fun really starts when you create custom zones.

You can create custom layouts with FancyZones

Tell each app where to be, and move them all at once with a keyboard shortcut


Creating custom layouts helps you overcome the limitations of window snapping in Windows 11 as far as ultrawide monitors are concerned. You can make your own zones by using either the Grid or Canvas layout. While the Grid layout offers a three-column setup to start and can be configured from there, I like the Canvas layout because it starts with just one zone. It's like a clean slate, and you can add zones from there. In the Canvas editor, you can click a zone to divide it, and move a divider by clicking and dragging the thumb. You can select multiple zones and Merge them together to effectively delete one if you have too many.

The cool thing about FancyZones is that you can create multiple zone layouts and switch between them with simple shortcuts. In the editor for a layout, click the pencil icon to assign that layout a number between zero and nine. This activates a keyboard shortcut for that layout, and you can trigger it by entering Win + Ctrl + Alt + [number]. You can also automate where windows appear by tweaking a setting in FancyZones. To do this, navigate through Windows & Layouts → FancyZones → Windows → Window behavior and hitting the Move newly created windows to their last known zone toggle.

This essentially gives FancyZones a "memory" for your windows. If you're like me and meticulously position your apps in the same spots on your ultrawide each time you work, FancyZones automates this process for you. In my case, Slack will find its home on the left, followed by a photo editor and two browser windows. Since you can also customize the window snapping zones yourself and hot swap them, there are endless ways to configure your ultrawide UI to improve your productivity.

Why FancyZones is perfect for ultrawide monitors

Ultrawide aspect ratios can be tough to keep organized without structure


I held off on switching to an ultrawide monitor for years, in part because I liked the separation dual monitors provided. I could easily use split screen window layouts on each monitor, and they combined to form a robust productivity system. Then, I realized that ultrawide monitors are just as good — provided you have the right organizational tools. On the Windows side of things, there's no better option than PowerToys' FancyZones. It's a great app for window management on any PC, but it really helps wrangle the open space provided by the best ultrawide monitors.


source
69
Android O.S | Apps / How to enter Safe Mode on your Android phone
« Last post by javajolt on March 16, 2026, 10:38:20 PM »
When's the right time to do it

Safe mode helps you see if a buggy app is causing your Android phone to crash, freeze, or slow down.

Here's how.


If your Android phone starts crashing, freezing, or acting strangely, it could be for several reasons, but one common culprit is third-party apps.

Any app installed from the Google Play Store can cause problems due to bugs, compatibility issues, or poorly optimized updates. Thankfully, Android has a troubleshooting tool called "safe mode" that can help you figure out if that's indeed the issue.

Safe mode temporarily disables all third-party apps and runs only the core Android system and preinstalled software. That creates a clean environment so you can see whether the problem is a third-party app or perhaps something deeper, such as your hardware.

How to boot your Android phone into safe mode

Most Android phones support safe mode, including Google Pixel phones, Samsung Galaxy phones, and many others. For this guide, I'm using a Pixel phone, but the process is very similar across Android devices.

1. Open the power menu

The first step is accessing the power menu on your Android phone. Press and hold the Power button and Volume Up button together for a few seconds. This opens the power menu with options like Power off and Restart.


Elyse Betters Picaro / ZDNET

2. Enter Safe mode

Once the power menu appears, press and hold the Power off option instead of tapping it. After a moment, your Android phone will display a prompt asking if you want to reboot into safe mode. Tap OK to confirm.

Your phone will restart automatically.


Elyse Betters Picaro / ZDNET

3. Confirm you're in safe mode

After the phone restarts, check the bottom corner of the screen. You should see a small "safe mode" label.

You may also notice some apps appear grayed out or missing. That is normal. Safe mode disables all third-party apps that you downloaded from the Play Store, leaving only the system apps that came with the device.

Note: Safe mode also enables Airplane mode on your device, but you can turn that off.


Elyse Betters Picaro / ZDNET

4. Use your phone like normal

At this point, use your phone normally for a few minutes or even hours. If the crashing, freezing, or slowdown has stopped, there is a strong possibility that one of your installed apps was causing the issue.


Elyse Betters Picaro / ZDNET

5. Exit safe mode

Before you can track down problematic apps, you need to exit safe mode.

Simply restart your phone by pressing and holding the Power and Volume Up buttons and then tapping Restart. On some Android devices, you can tap the safe mode label to restart your phone and exit safe mode.

Your phone should boot back with all your apps available again.


Elyse Betters Picaro / ZDNET

6. Find the buggy app

This can take a bit of time, but it is the most reliable way to identify what is causing problems on your phone.

Once you have exited safe mode, start uninstalling recently installed or recently updated apps one at a time. After removing each app, restart your phone and check whether the issue returns. You can also try using your apps before deleting them. If one behaves strangely or you need to force stop it, you've likely found the offender.

You can find recently updated apps in the Google Play Store.

Tap your profile, go to Manage apps and device > Manage, and select Recently updated to sort apps by their most recent updates. You can also open an app listing to review its latest changes under What's new.


Elyse Betters Picaro / ZDNET


Q: What exactly does safe mode do on Android?

Safe mode itself doesn't fix your Android phone's problems. It simply helps you diagnose them.

Safe mode disables all third-party apps so only Android system software and preinstalled apps run. This then lets you determine whether issues like freezing, crashing, or slow performance are caused by an app. If your phone works normally in safe mode, you can usually narrow the cause down to a third-party app that was recently installed or updated.

Q: What if my phone still has problems in safe mode?

If your phone still has problems while in safe mode, the cause may be a deeper software issue or even a hardware problem. In that case, you may need to check for system updates to install, reset your device, or even contact the manufacturer for extra support.

You can also try clearing your Android phone's cache as the next troubleshooting step.

Q: Will safe mode delete my apps or data?

Safe mode primarily prevents third-party apps from running, but it does not delete them from your phone. Google warns that safe mode does remove some home-screen widgets. So, if you use widgets, it recommends taking a screenshot to help you put them back.

Q: Why does my phone run faster in safe mode?

With third-party apps disabled, your phone has fewer background processes to manage. If performance improves significantly, one of those apps may be using too many resources or crashing in the background, and you may want to delete it.

source
70


Most of us think deleting a file means it’s gone for good. But “delete” on a Windows device often just means “out of sight,” not necessarily “out of reach.”

That’s where File Shredder, a new feature within Malwarebytes Tools for Windows, comes in. File Shredder lets you securely delete files from your hard drive or USB drive, so the files are not just removed—but completely unrecoverable, even with specialized recovery software.

What File Shredder does differently

When you delete a file by placing it in your Recycle Bin and emptying the contents, your computer typically removes the reference to it—but the data itself can remain on the drive until it’s overwritten. That leftover data can sometimes be recovered using basic digital tools, some of which can even be downloaded for free online. These data traces pose a problem if the file you want to delete includes personal, financial, or other sensitive information, like tax documents, scanned IDs, contracts, or anything else you would like to remain private forever.

File Shredder goes beyond standard deletion by instead permanently overwriting the file data, ensuring it can’t be reconstructed or recovered. Once a file is shredded, it’s gone for good—no undo, no recovery, no second chances.

That makes File Shredder especially useful when:

   • You’re cleaning up sensitive files before selling or donating a device

   • You need to securely remove files from a USB drive

   • You’re minimizing digital clutter without leaving data behind

   • You want peace of mind that private files stay private

How to use File Shredder

File Shredder is designed to be powerful without being complicated.

To use File Shredder:

• Open the Malwarebytes app and select the “Tools” icon from the lefthand menu (the screwdriver and wrench icon)

• From this menu, find and click on “File Shredder”

• Once here, you can manually add files or folders to the list and then click on the button “Delete permanently”

• You will be asked to confirm your request before File Shredder deletes the files


After your files are deleted by File Shredder you can move on, confident that the data can’t be accessed again.

Protection means your data is in your control

Cybersecurity isn’t just about blocking threats—it’s also about giving you control over your own data. File Shredder provides a way to do exactly that, helping you close the door on files that you no longer want on your devices.

Because when you’re done with a file, it should really be done.

source
Pages: 1 ... 5 6 [7] 8 9 10