◄ page 1 Fix Missing DLL Files
 Windows OS has a shared library that contains the DDL files. The DLL files are the system files that are necessary to launch certain applications on the system. However, if your PC is missing a DLL file required to run a specific app, that app will not work.
The easiest solution to this issue is manually downloading the DLL file and placing it in the apps folder. To download the missing DLL files, navigate to DLL‑files.com.
Be careful while downloading the DLL files. Many sources might provide you with infected files in the name of genuine ones to infiltrate your system with a malware program.
 Fix Stucked Update
A stuck Windows update can be a nasty beast. They can be either stuck at the download stage with the completion bar never hitting 100%. Or they can download but pause part ways through installing when you restart your computer. And in rare cases, Windows may refuse to find updates or throw up an error message saying they cant be installed.
To fix such issues here is what you can do:
1. In Windows, launch a Command Prompt (Admin) window by searching for it, right-clicking its icon, and selecting Run as administrator from the menu.
2. In the terminal, type
net stop wuauserv and hit Enter. This will prevent Windows Update from running and give a few repair options.
3. Now, open a File Explorer window and go to
C:\Windows\SoftwareDistribution. Select all the files in this folder and hit Delete. This will delete all the files that Windows Update has downloaded and forces them to be downloaded again.
4. Once this is done, open up the Admin Command Prompt window again, type
net start wuauserv, and hit Enter.
5. Restart your computer, and you should be good to go again.
Windows 11 Frequent Annoyances and FixesShow Hibernate in Power MenuHibernate is a power-saving state in which all actions on your computer are stopped. It is very similar to sleep, but instead of saving your open documents and running applications to your RAM, it saves them to your hard disk. That means while in hibernate state, your computer use zero power. However, when you start your computer from hibernation, it will take more time than Sleep Mode.
To support the Fast Startup feature, Microsoft has completely removed the Hibernate option from the Power menu of Windows 11. However, you can easily restore it by following these steps:
1. Press Windows + R to launch the Run Command window.
2. Type
powercfg.cpl in the given space, and hit the enter key.
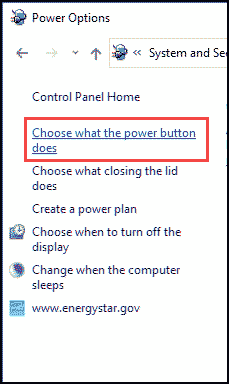
3. On the left pane, click on
Choose what the power button does option.
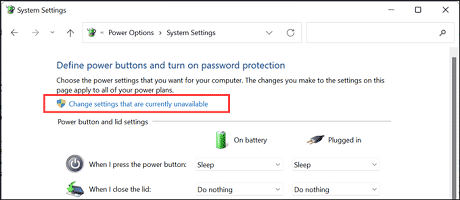
4. On the System Settings window, click on
Change settings that are currently unavailable.
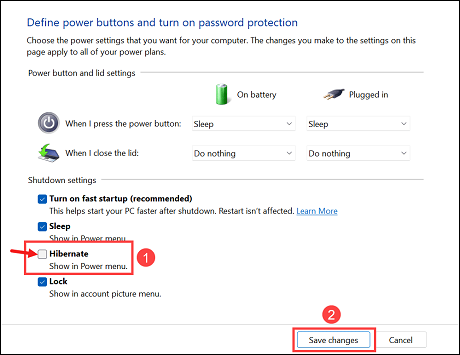
5. Now, under
Shutdown settings, tick
Hibernate checkbox and click on Save changes to show it in the power menu.
 Shutdown/Restart without Installing Updates
Windows always seem to wait to install updates on your PC, often at just the moment when you want to quickly shutdown and restart your computer. Fortunately, there is a command that you can use to shut down or restart your PC in peace immediately and prevent the updates from being installed.
Using Command Prompt1. Launch Command Prompt with administrator right.
2. Use this command to restart your computer without installing updates:
restart /s /f /t 003. Use this command to shut down your computer without installing updates:
shutdown /s /f /t 00From Power SettingsYou can use Power Settings to set the power button to shut down your computer without updating.
1. Press Windows + R to launch the Run Command window.
2. Type
powercfg.cpl in the given space, and hit the enter key.
3. On the left pane, click on
Choose what the power button does option.
4. From the drop-down menu, next to
When I press the power button, select
Shutdown.

5. You can do it for both
On battery and
Plugged in.
Manage Windows UpdatesMicrosoft frequently releases updates to Windows OS for fixing bugs and securing the OS with the latest security patches. However, many users might not want to update their Windows 11 system for a particular period. To manage Windows updates and schedule them as per your convenience, you can follow these steps:
1. Open Windows Settings and switch to
Windows Update on the left pane.
2. On the right pane, click on
Pause for 1 week to pause updates for a week. You can pause updates for up to 5 weeks. Since I have joined Insider Program, I can do it only for a week.
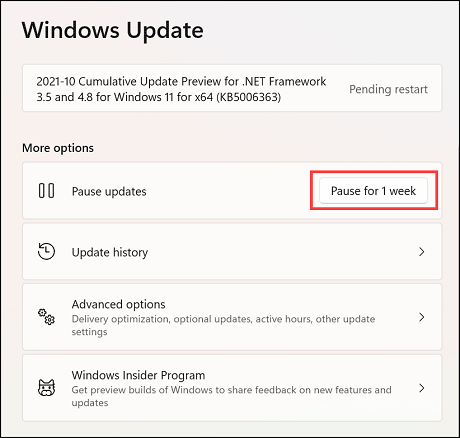
3. On the same Windows 11 Update settings, click on the
Advanced options.
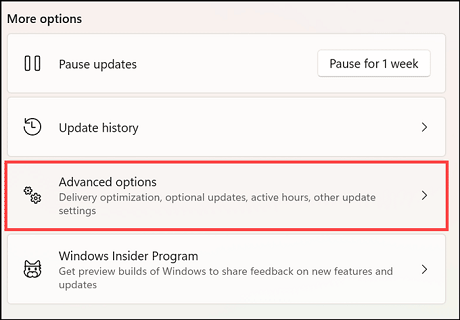
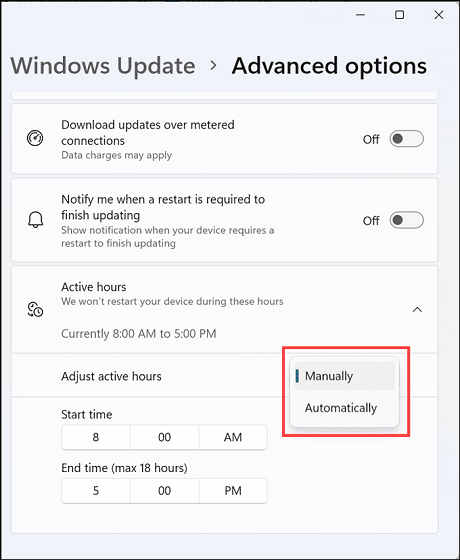
4. Under Active hours, you can set when you dont want to restart your device for updating. If you choose Automatically, Windows will automatically detect when your device is not in use and install updates. On the other hand, you can also manually set the Active hours of your device so that you are not disturbed during that time.
 Enable System Restore
Windows 11 comes with a helpful feature known as System Restore that can undo system changes by reverting your device to a previous restore point. Despite having such usefulness, it is surprising that the feature is turned off and not in Windows settings. Even if you enable it, it automatically gets disabled after every update.
Luckily, you can turn ON the System Restore point easily. Here are the steps for that:
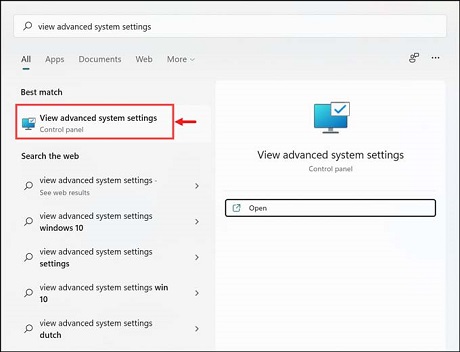
1. On the Windows search box, type
View Advanced System Settings and click on its icon to launch.
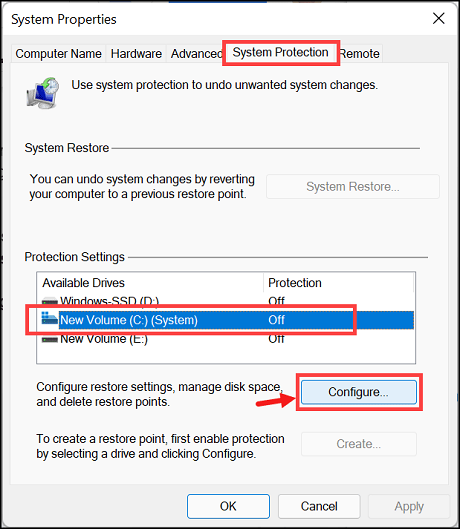
2. Switch to the
System Protection tab, and under the
Protection Settings, select your system drive and click on
Configure.
3. On the next window, under Restore Settings, click the bullet button next to
Turn on system protection.
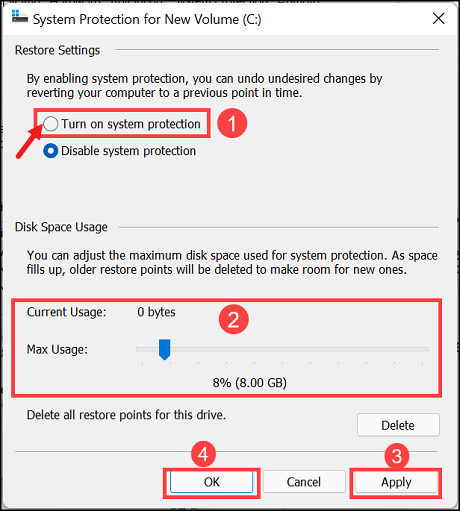
4. Under the Disk Space Usage, set the
Max Usage, click
Apply and
OK.
Stop USB devices from going to SleepWindows likes to power down USB devices when your screen is off. This is done for a good cause, in an effort to conserve battery life. But while this can be a helpful feature, it can also cause problems and headaches, particularly for attached storage hardware like an external USB hard drive.
The last thing you want is your backup process interrupted because of this pesky little setting.
To adjust this setting, follow these:
1. Open Windows
Settings, click on
Bluetooth & devices from the left pane, and select USB settings.
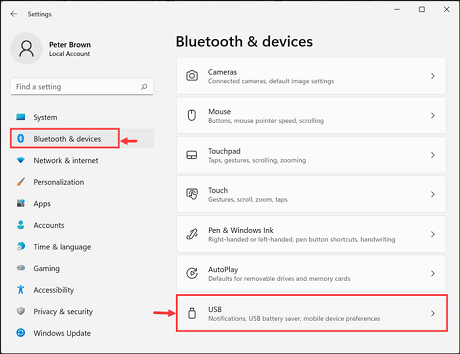
2. Under USB settings, turn OFF the
USB battery saver.
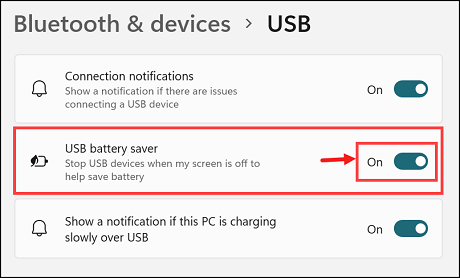
Now your USB devices will remain active even if your screen is turned off.

2. Turn on the
Mono audio by toggling the button.
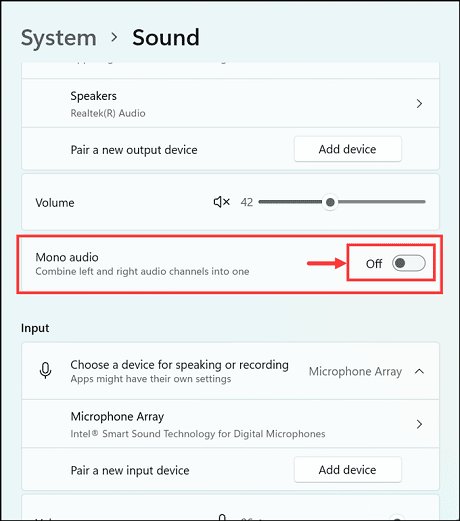
3. This will combine left and right audio channels into one.
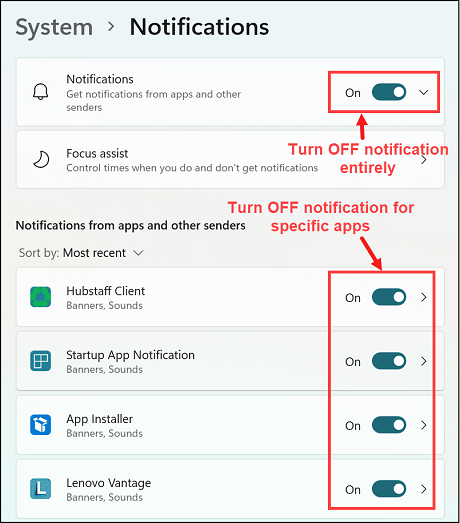
Stop Annoying NotificationsWindows 11 sure do like to show you more notifications like Windows 10. Usually, this is a good thing, but when other apps start to pop up banners and play sounds, it can get a bit distracting. Luckily, you also get a fair amount of control here and can select which apps are allowed to notify you.
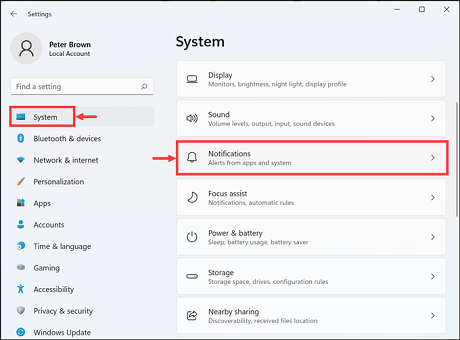
1. Open Windows
Settings, navigate to
System ->
Notifications.
2. You can turn OFF the Windows 11 notifications entirely or for some specific apps.
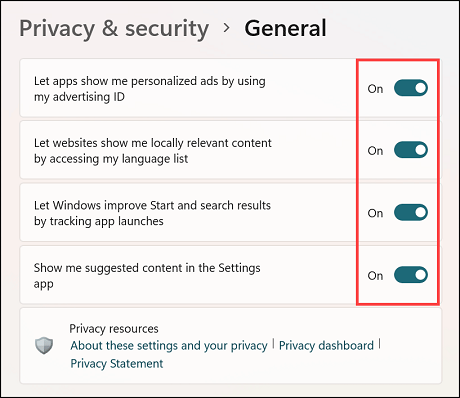
 Block Windows Ads
Microsoft started littering advertisements through OS starting from Windows 10 and continuing on Windows 11. New adverts are delivered directly to your computer, promoting Microsoft products or other apps and games. But the good thing is that there are options to turn all this off.
Here is how you can do that:
1. Navigate to
Settings ->
Privacy & security.
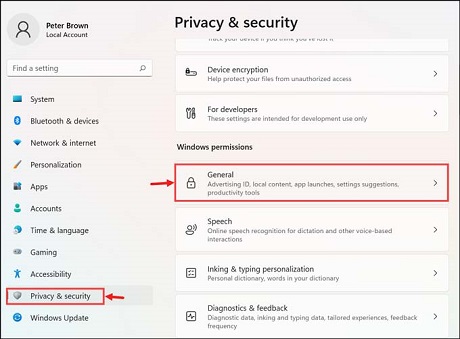
2. Click on
General settings.
3. Turn Off the advertising settings.
 Enable or Disable Optional Features
Windows 11 is a feature-rich operating system; however, you might not need all of them. You may want to get rid of some unwanted features like Microsoft XPS Document Writer, Windows PowerShell 2.0, or Windows Media Player.
To disable Optional Features, follow these steps:
1. Open the Run Command box.
2. Type
optionalfeatures and hit the enter key.
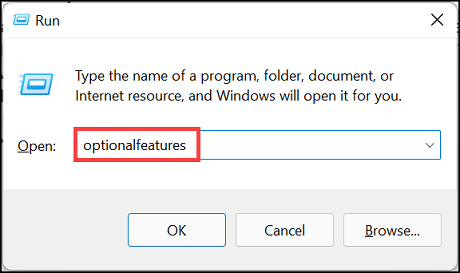
3. On the Windows Features window, turn off the features by unchecking the box.
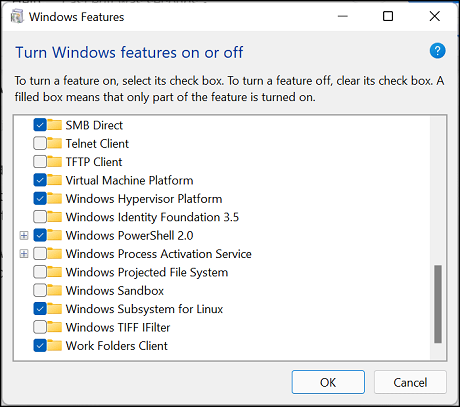
4. Additionally, you can also enable the features you need, like Hyper-V and others.
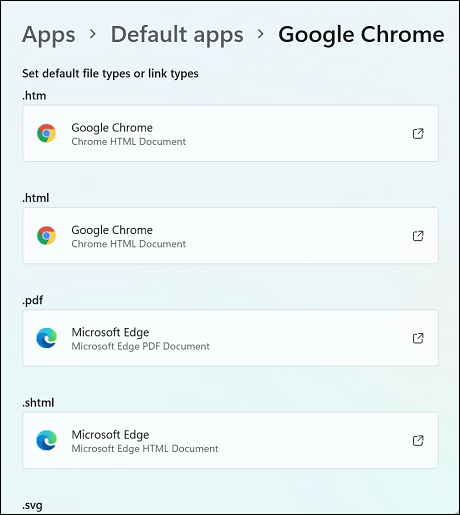
Change the Default ApplicationsOne of the most annoying things about Windows 10 is how it handles default applications. In many cases, you will try to perform a specific task, only to find an unexpected app like Edge launching and opening that file.
Sadly, Microsoft has made it challenging to set an app as default. Now you have to delve into the more manual system in the Settings app. That too, every time the operating system resets your defaults after each major update.
Here is how you can set the default application in Windows 11:
1. Open Windows 11
Settings.
2. Navigate to
Apps ->
Default apps.
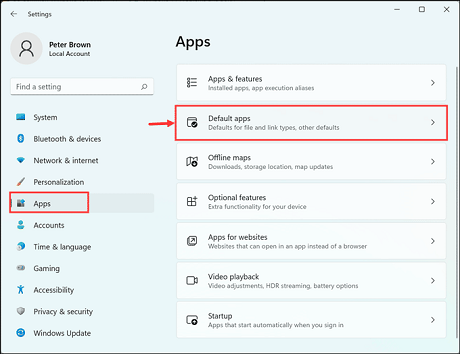
3. Choose the app that you want to set as default.
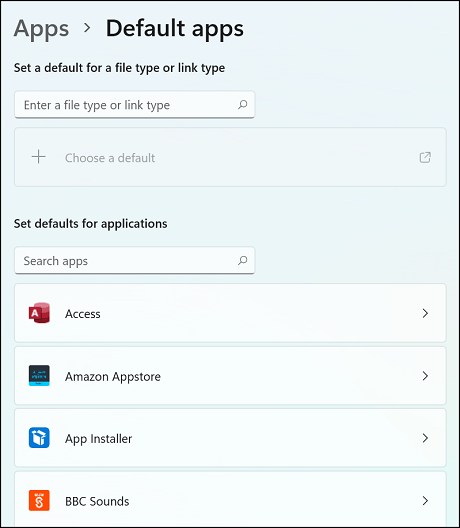
4. You have to set the default app for every file type.
 Set Metered Connection
Suppose you are working on an internet network with a limited data allowance. In that case, it might be disastrous if all the available data is consumed in Windows update or other non-essential processes.
To stop this, you can set the metered connection on that particular network using these instructions:
1. Open Windows Settings.
2. Switch to
Network & internet settings, and click on
WiFi to open its settings.
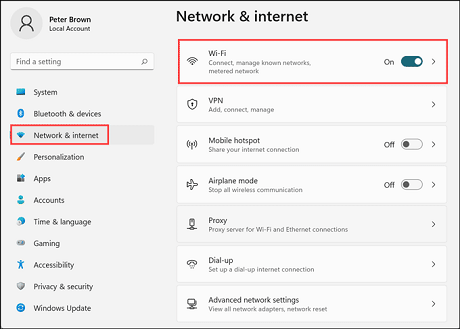
3. Click on the WiFi network name to open its properties.
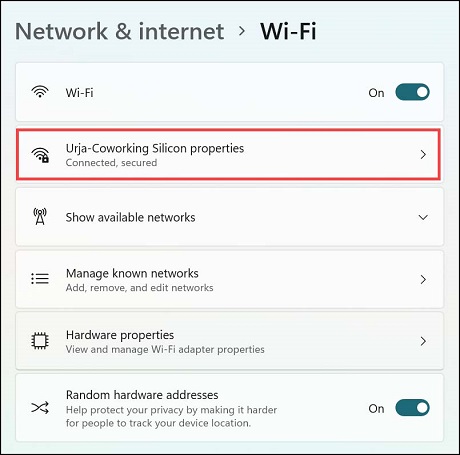
4. Toggle the button next to
Metered connection to switch it ON.
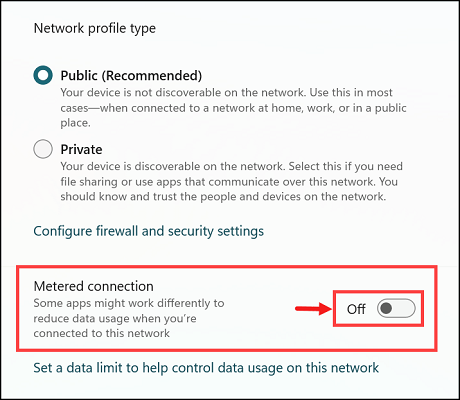
After enabling the metered connection on a network, Windows will not use it for updating and other optional processes that require the internet.
Bottom LineSo these are the most common Windows 11 Problems and Annoyances that most users are facing after the launch of the initial release. Microsoft is likely to provide solutions to most problems in the next update. Till then you can follow the methods listed in this guide to get rid of those problems and annoyances.
■source

