Microsofts latest operating system, Windows 11, is slowly rolling out for every supported device. It comes with quite handy new features and an all-together refreshed UI. Though Microsoft claims that Windows 11 is one of the most secure OS, users are facing problems while installing it or while using it after installation. Since Windows 11 is still in its early release phase, installation problems and compatibility issues are common to face.
Additionally, though it comes with pretty shiny features, some of those can be useless and annoying for a few users, and they might want to disable them.
If you are facing any type of problem on Windows 11, from installing it to using it, this guide will provide you with quick ways to deal with them. We will also discuss some Windows 11 annoyances and their solutions.
Windows 11 Problems and SolutionsWindows 11 Installation Problems and FixesAfter the official release of Windows 11, many users try to upgrade their devices to it using several ways. Some of them are facing problems during the installation process. If you are unable to install Windows 11 on your system, do follow these:
Check Windows 11 Hardware RequirementsIf you are having trouble installing Windows 11 on your device, it might be because your system does not comply with the prerequisites of Windows 11. Microsoft is pretty strict about some of the hardware requirements for Windows 11, such as TPM 2.0, secure boot, 8th gen, and higher processor. Check your device for the following requirements:
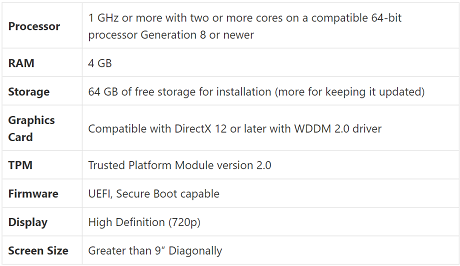
Check whether your PC meets all the listed specifications and, if possible, upgrade some hardware components that you can replace, like RAM, to make your machine Windows 11 ready.
Check Windows 11 CompatibilityIf you cannot verify your device compatibility or are unsure about some requirements, Microsoft has provided a simple tool that would help you in it. The PC Health Check App was removed by Microsoft because of the controversy it created. However, Microsoft has recently updated and relaunched it.
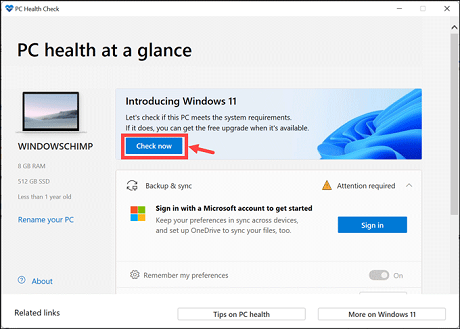
1. On your Web Browser, navigate to this URL(
http://aka.ms/GetPCHealthCheckApp ) to direct download the PC Health Check App from Microsoft.
2. Install the app upon its download and launch it.
3. On the App window, click on
Check now button under the
Introducing Windows 11 heading.
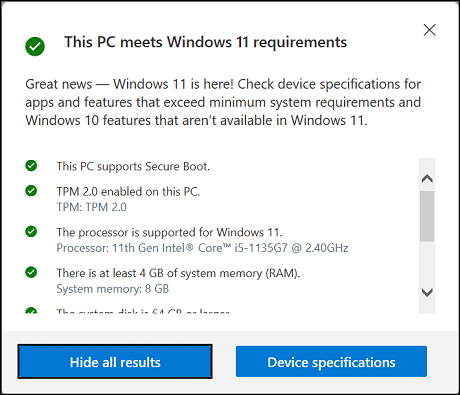
4. If your PC ticks all the requirements for Windows 11, you will see this box.
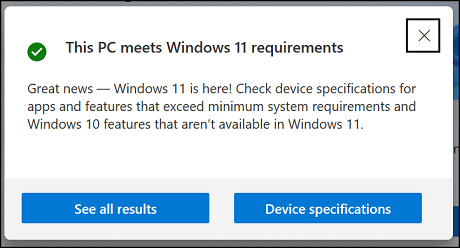
5. Click on
See all results to know in detail about the hardware configuration of your device that matches with the Windows 11 demands.
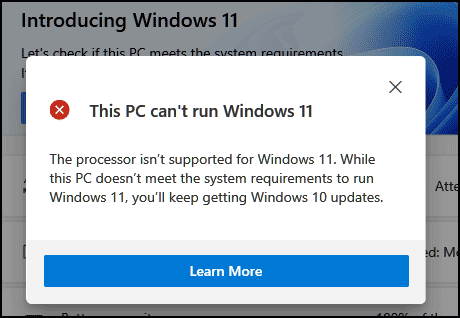
6. In case your PC is incompatible with Windows 11, the app will display this pop-up.
 Fix TPM Issue
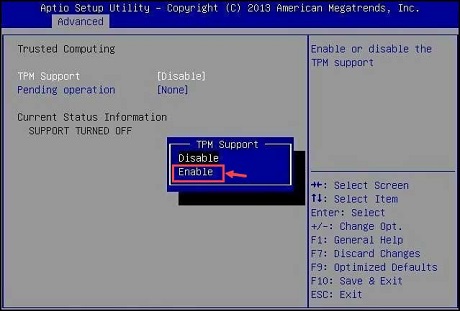
TPM 2.0 is one of the primary requirements for Windows 11 installation. It might be possible that your PC has TPM but it is not enabled.
If the TPM is disabled, you will have to turn the TPM state chip to ON directly from BIOS.
Note: Procedure to reach BIOS settings might differ depending on the device manufacturer
1. Restart your system
2. Press the F2 key (or fn+F2) during boot up to navigate to the BIOS menu.
3. Using the arrow key, navigate to the Security tab.
4. Find a listing for either TPM, Intel Platform Trust Technology (IPTT), or AMD CPU fTPM.
5. Enable the TPM and press F10 to Save & Exit.
 Fix Secure Boot Issue
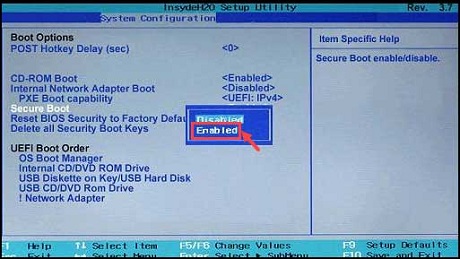
Like TPM, your computer might also have Secure Boot, but it might be disabled.
If Secure Boot is OFF, enable it from the BIOS.
1. Restart your system
2. Press the F2 key (or fn+F2) during boot up to navigate to the BIOS menu.
3. Using the arrow key, navigate to the Security tab.
4. Find the Secure Boot setting, and if it is disabled, set it to enabled. The Secure Boot setting can also be found under the
Boot tab or the
Authentication tab.
 Fix Slow Internet Connection
Many users are facing slow Wi-Fi or internet connection after upgrading to Windows 11. You can try the following methods to fix that.
Update Network DriverAn outdated network driver can be a major cause of a weak internet connection. Follow these steps to update your network driver in Windows 11:
1. Right-click on the Start and select
Device Manager.
2. Expand the Network adapters section to see the list of drivers.
3. Right-click on the Wireless Driver and choose
Update driver.
4. Follow the on-screen instructions to update the driver.
5. Restart your computer after the update process.
If the problem persists, you can try uninstalling and re-installing the driver.
Run Internet TroubleshooterWindows 11 let you run troubleshooters for common problems like Network Issue, Sound Issue, Display issue, and more. If you are experiencing a slow internet connection on your Windows 11 system, try the following steps:
1. Open Windows 11 Settings, switch to the System Settings from the left pane and select
Troubleshoot from the right.
2. Click on the
Other troubleshooter's option.
3. On the next page, click on the
Run button next to the
Internet Connections.
4. Follow the on-screen instructions and check problem persists after the whole process.
Windows 11 File Explorer still looks like Windows 10After upgrading to Windows 11 from Windows 10 operating system, some users are experiencing the same old UI; for example, File Explorer still looks like Windows 10s. If you are experiencing the same problem, follow these steps to get back the Windows 11 File Explorer:
1. Launch
Windows File Explorer.
2. On the top of the File Explorer taskbar, select
View.
3. Click on Options to launch the
Folder Options window.
4. In the Folder Options window, switch to the
View tab and ensure that the
Launch folder windows in a separate process option are unchecked.

5. Click
Apply and
OK.
6. Restart the Windows File Explorer.
Fix Empty Widget BoardWindows 11 comes with a Widget Board that has widgets for quick access to News, Weather, Calendar, and more. After installing or upgrading to Windows 11, users have reported the empty Widget Board problem. Fortunately, it is pretty easy to fix that.
Launch Widget Board by pressing the
Windows + W key combination on your keyboard, and click on
Add widgets button.
Next, click on the
Sign out option at the top right corner and sign in to your account again.
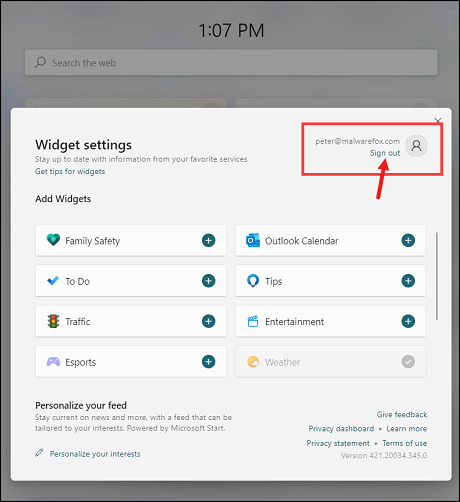
After signing in, you can add the widgets you want, which would be displayed on the Widget Board.
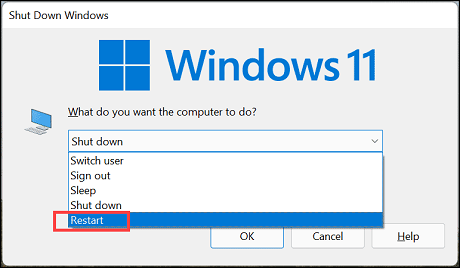
Fix Windows 11 Unresponsive Start MenuOn upgrading to Windows 11, many users have reported that they cannot access the Start Menu because it is unresponsive. This issue can be solved with a simple Restart or by fixing the corrupted file.
To restart the device without using the Start Menu, use
Alt+F4 and select
Restart from the drop-down menu of the
Shut Down Windows window.
If the problem persists, try the following methods to fix the corrupted files that might be responsible for the issue.
Run DISM CommandDeployment Image Servicing and Management (DISM) re-deploys the system image all over. During the re-deploying process, it fixes any system error on its way. So, it is possible that Windows 11 unresponsive Start Menu error can be solved using this.
1. Open Command Prompt with admin rights.
2. Type the following command and press the enter key:
DISM /Online /Cleanup-Image /RestoreHealth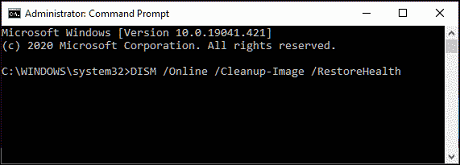
3. The scan would take some time to finish.
4. After the scan is completed, restart the device.
Use SFC CommandSFC scan is a command-line tool that scans your system for any errors and glitches and automatically repairs them. If you are still struggling with Windows 11 unresponsive Start Menu error, you can try the SFC scan.
Here are the steps for that.
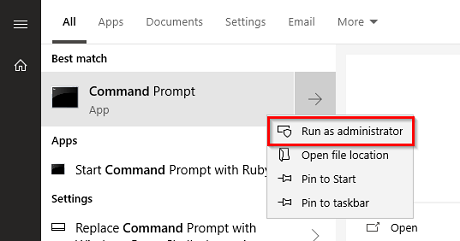
1. From the Windows search bar, search and launch the Command Prompt with administrator rights.
2. Type this command and hit the Enter key:
sfc/scannow.
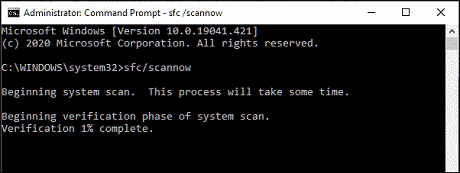
3. The scanning would start, and it would take some time to complete depending on your system configuration.
4. After the scan, if it found any problem, the solution would be automatically applied.
5. Close the Command Prompt window and restart your system.
Fix Windows 11 Memory Leak BugOne of the most typical troubles many Windows 11 users are facing is the Memory Leak. It occurs when the OS is unable to manage the memory allocations. Users have reported that even after closing the File Explorer, it remains in the RAM, unnecessarily consuming its power and thereby causing the Memory Leak. A memory leak can highly slow down the system and make it unresponsive.
Since Microsoft has not acknowledged the problem yet, there is no official solution to the problem as of now. The only thing you can do is restart your File Explorer every time you experience this issue.
To check whether your system is the victim of this bug, check the RAM consumption from the Task Manager. If the File Explorer is consuming a lot of RAM even after no use, it means the bug is causing the Memory Leak.
Fix 100% Disk Usage100% Disk Usage is one of the pretty common Windows OS problems. It usually occurs on HDD when the hard disks read/write speed has exceeded the 100 -150Mbps threshold. You can quickly diagnose this problem by accessing the Task Manager.
To fix 100% Disk Usage of Windows 11, you need to apply the following methods:
Disable the SysMainSysMain, formerly known as Superfetch, is a service that runs in the background in Windows systems and quietly analyzes the RAM and applications that your system uses most.
It then preloads frequently used applications into the RAM to load them much faster with subsequent launches. The drawback to SysMain is that it constantly hogs the CPU and RAM, slowing down applications considerably.
Although it does not harm your computer, it is safe to disable it if your system is continuously sluggish because of 100% disk usage.
To disable SysMain on Windows 11, follow these steps:
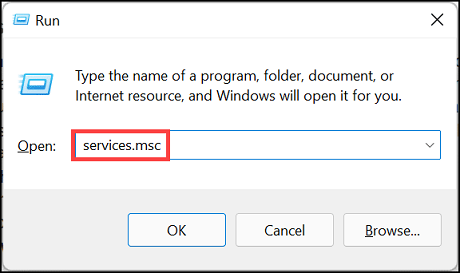
1. Press
Windows + R to launch the Run command box.
2. Type
services.msc and hit the enter key.
3. The
Services window will open, displaying all the running services on your PC. Scroll down and locate the
SysMain option.
4. Right-click on
SysMain and select the
Stop option as shown below.
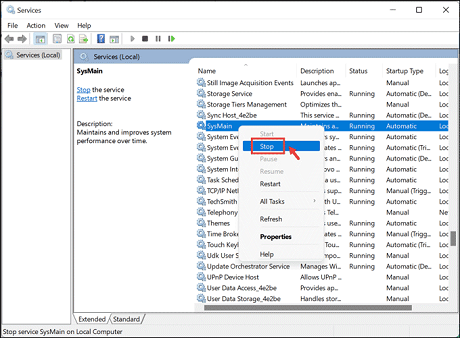
5. The process would be stopped with immediate effect.
You can permanently disable the SysMain by following these steps:
1. Right-click on the
SysMain and select
Properties.
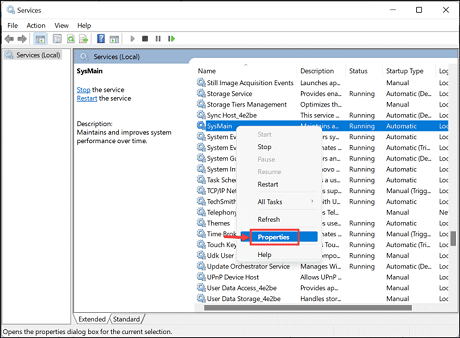
2. From the drop-down menu, next to
Startup type, select
Disabled.
3. Click Apply and OK.
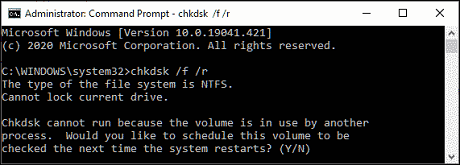
Run CHKDSKRun a
chkdsk command to scan and fix issues with your hard drive.
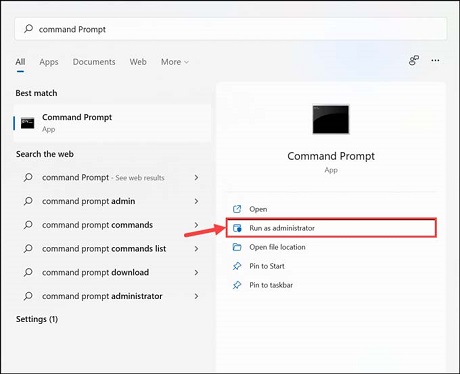
1. Launch
Command Prompt as Admin.
2. Type
chkdsk /f C: and hit the enter key
3. The system will notify you that the drive is currently in use and execute the command when you restart the system.
 source
