Windows 11 comes with a ton of changes. A new UI, android app compatibility, improved resources management, and so much more are all packed into Microsoft's brand new operating system. However, it is still the same OS underneath, and thats a good thing. If you made the jump to Windows 11, you may realize a few things have changed, starting with the placement of the Start button.
In this guide, we have jotted down a few Windows 11 tips and tricks to help you with the transition and learn new features.
 1. Change the Taskbar and Start Menu Alignment
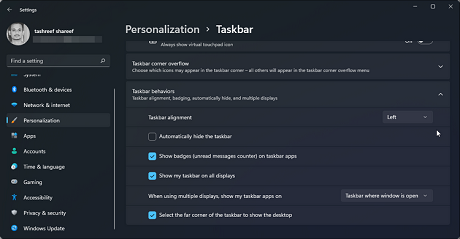
Among the first change, you will notice in Windows 11 is the Taskbar and Start menu location. Microsoft has decided to move it to the center for usability and aesthetic reasons.
While I quite like the new placement, you may prefer it in the original position. Fortunately, you can revert the changes and move the Taskbar back to the left.
To change the Taskbar alignment:
1. Right-click on the
Taskbar and select
Taskbar Settings.
2. Alternatively, go to
Settings >
Personalization >
Taskbar to access the Taskbar
settings.
3. Scroll down and click on
Taskbar behaviors.
4. Click the drop-down for Taskbar alignment and select
Left. Windows 11 Taskbar will now
move to the left.
2. Customize the Recommended Section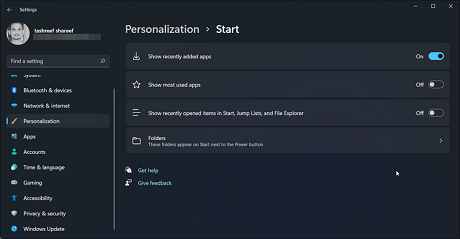
The Recommended section in the new Start screen is powered by Microsoft 365. It shows your most recently installed apps, opened files, and other recommendations. If you dont want everyone to know about your recent activities, you can turn it off in the settings.
1. Press
Win + I to open
Settings.
2. Next, open the
Personalization tab in the left pane.
3. Click on
Start.
4. Here, toggle the switch for
Show recently opened item in Start, Jump List and file Explorer to
Off.
5. Now, if you click
Start, you will find a vacant space under
Recommended. To fill the
void, you can show recently installed apps.
6. Go to
Personalization >
Start and toggle the switch for
Show recently added
apps to
On.
3. Display the Classic Right-Click Menu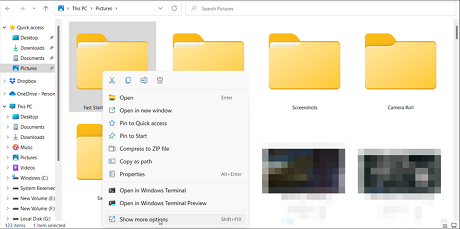
Windows 11 comes with a new simplified right-click menu. It is less cluttered and shows only the most frequently used options.
However, the classic context menu is still part of Windows 11. To access it, right-click in
File Explorer and select the
Show more options to open a spill-over menu. You can also use the
Shift + F10 keyboard shortcut to access this option.
4. Customize Snap Windows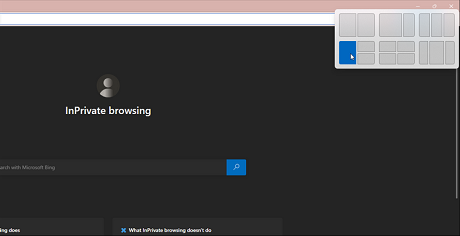
With the new Snap windows feature, you can automatically resize and arrange windows on your screen. If you are used to the Win + Arrow shortcut in Windows 10, the new iteration takes it a step further. Though, the shortcuts are still effective.
To snap windows in Windows 11, hover your mouse over the Maximize/Resize button, and you will see a snapping template. Choose your preferred template for the active window and then continue to snap other windows accordingly.
5. Wheres the Task Manager?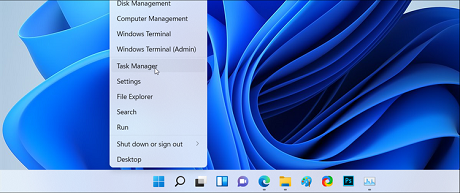
In Windows 10, you can access the Task Manager directly from the Taskbar. However, that has changed in Windows 11. While there are
various ways to access the Task Manager in Windows 11, an easy way to do it is from the Start menu.
To open the Task Manager, right-click on
Start or press
Win + X and select it from the
WinX menu that appears.
6. Add Folders to the Start Menu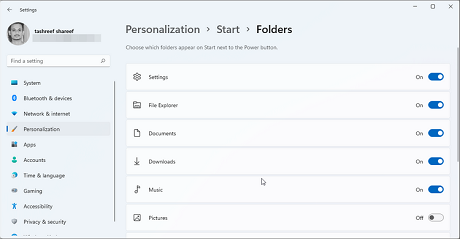
Windows 11 no longer allows you to pin folders to the Start Menu. Instead, you can add system folders including File Explorer, Settings, Documents, Downloads, Music, Pictures, Videos, and the Personal folder to Start.
To pin folders to your Start menu:
1. Press
Win + I to open
Settings.
2. Click on the
Personalization tab in the left pane.
3. Next, click on
Start and then on
Folders.
4. Here, you can choose which folders appear on
Start next to the
Power button. To
add, toggle the switch for each folder and set it to
On.
7. Hide the Widget and Chat App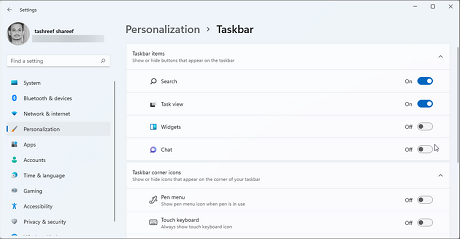
By default, the new Taskbar features the Widget and Chat (Microsoft Team) app. The widget app allows you to check information related to weather, sports, nearby traffic, Windows apps tips, calendars, and more at a glance. However, if you would rather have more taskbar space, you can turn it off in the settings.
To Hide Widget and Microsoft Team app:
1. Open the
Settings panel using
Win + I.
2. Then go to
Personalization and open
Taskbar.
3. Under
Taskbar items, toggle the switch for
Widgets and
Chat and set it to
Off.
8. Customize the Quick Settings Panel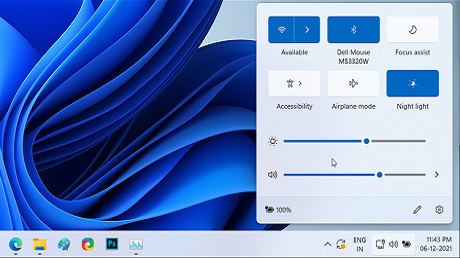
Microsoft has broken down the classic Action Center into two separate pop-ups in Windows 11. Click on the
Time and Date area to bring up the Notification panel and the Calendar.
Click on the
Network,
Speaker, and
Battery icon to access the Settings panel. It consists of your brightness and volume controls, connectivity options, and other accessibility features.
Click the
Pencil (Edit quick setting) icon to add more features. Next, click on
Add and then select the feature to add. Unpin a feature to remove it from the panel.
9. Manage Open Apps From the Desktop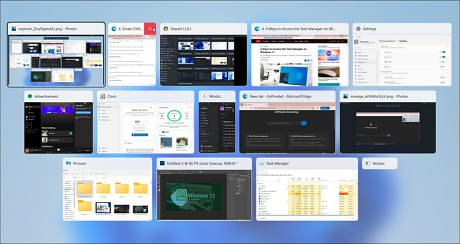
If you work with multiple apps simultaneously, switching between the apps can be cumbersome. You can use the
Ctrl + Tab shortcut to switch between apps easily.
To manage apps, press and hold the
Ctrl + Tab key to view all the open apps. To switch between apps, use the
Arrow or
Tab key. You can also use the
Ctrl + Tab keyboard shortcut to jump between apps in the most recently used order.
10. Title Bar Windows Shake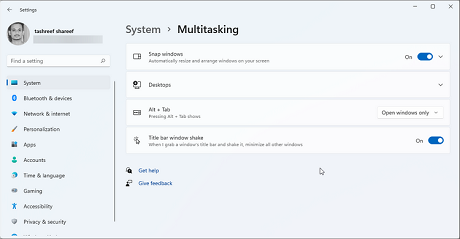
Windows 11 has another cool trick up its sleeves called "title bar window shake." When enabled, it allows you to minimize all the open windows except for your active window with a shake.
To enable Title bar windows shake:
1. Go to
Settings >
System >
Multitasking.
2. Next, toggle the switch for
Title bar window shake and set it to
On.
3. To test it, press and hold the title bar for any open window and shake it a little to minimize all but
one window. Shake it again a little to restore the minimized windows.
11. Use Focus Assist to Minimize Distractions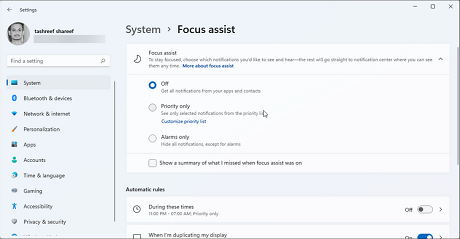
Windows 11 has borrowed a few useful features from its predecessor and has made it easier to use. Focus Assist, introduced in Windows 10, helps you minimize distraction and increase productivity by muting less important notifications during work hours.
To
enable Focus Assist, go to
Settings >
System >
Focus Assist. Next, select
Priority only to see a few select notifications or
Alarms only to hide all notifications except for alarms.
You can also set automatic rules to start Focus Assist during set hours and while doing specific activities.
12. Use Focus Session to Increase Productivity
Windows 11s new clock app features a Focus Sessions tab. This tool is a handy productivity-focused feature that can help you build healthy digital habits, set daily goals, and challenge yourself. When you open the Focus Session tab, you will see a focus timer, your daily progress report, and the options to sync your Spotify playlist and Microsoft To-Do account.
To start your Focus session:
1. Press
Win + S to open the Search bar.
2. Type
clock and open the app from the search list.
3. In the
Clock app, open the
Focus session tab.
4. Next, set your daily goal to study or work in hours. Focus Session will automatically include a few
five-minute breaks every 30 minutes.
5. Click the
Start focus session button and start working until the reminder pop-up asks you to
take a few minutes off.
13. Enable Dark Mode and Night Light
Another handy feature coming over from Windows 10 is the ability to choose different display modes for the user interface. You can select from Dark, Light, and Custom color mode to change the colors that appear in Windows and your apps.
To enable Dark Mode in Windows 11, go to
Settings >
System >
Personalization >
Colors. Then, click the drop-down for
Choose your mode and select
Dark.
If you often work till late at night, you can use the Night Light feature in Windows 11. When enabled, it acts as a blue light filter by switching to warm colors. You can access
Night Light under
Settings >
System >
Display.
Tweak, Customize and Be Productive with These Windows 11 Tips and TricksWhether you are a power user or trying to get familiar with Windows 11, these tips and tricks will help you adjust to the changes in the new OS.
While some tricks are just a carry-over from Windows 10, the new version comes with its own set of nifty features to further enhance the experience.
source
