The use of DVDs to install an operating system is now dead and buried. It is in fact much easier and faster to install Windows 11 from USB using an external drive. The most immediate solution to install Windows 11 from USB is to use the
Media Creation Tool, a utility prepared and constantly updated by Microsoft. If you want to create a bootable Windows 11 USB drive, you can use Microsofts Media Creation Tool: it is a free program from Microsoft that allows you to download
Windows 11 ISO and then create DVDs or USB drives to install the operating system.
To install Windows 11 from USB starting from an ISO file, you will then have to turn to other utilities. The best way to proceed is to use Rufus, an application that makes any USB drive bootable and allows you to insert a Windows 11 ISO image already stored on the system. The advantage of Rufus over other similar tools is that the configured drive, containing the Windows 11 installation files, will be compatible with UEFI BIOS.
Before starting, to create a bootable USB drive to install Windows 11 via USB you will need:
The Rufus software
A Windows 11 ISO image
A USB Pendrive of at least 8GB
Steps to Create Windows 11 Bootable USB Drive Using RufusStep 1: You need to download the
portable version of Rufus.
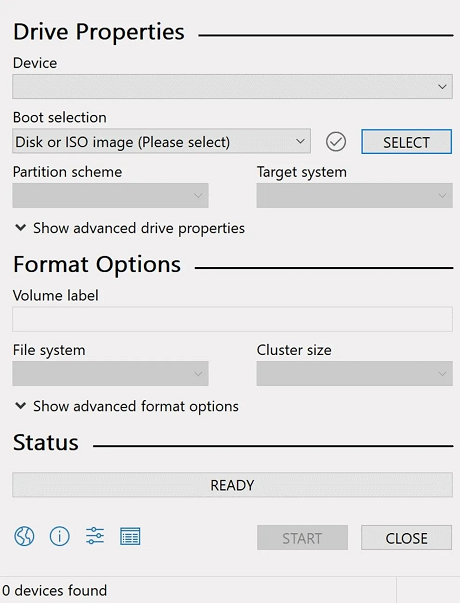
Step 2: Start the program and select the USB storage device on which you want to store the Windows 11 installation files from the Drive device (Note: If the drive does not appear, check the USB disk drive list box).
 Step 3
: Download the Windows 11 ISO from the
official website.
Step 4: Click Select to choose the Windows 11 ISO file downloaded in the previous point.
Step 5: In Image Options leave Standard Windows Installation selected.
Step 6: Now from the Partition Scheme menu select MBR.
Step 7: Press the ALT + E key combination and choose BIOS or UEFI from Target System.
Step 8: Enter a label in Volume Label, and Choose FAT or NTFS as the file system.
Step 9: Now click on the Start option to create Windows 11 bootable USB drive.
source
